
Config
The printformer template includes containers that are filled using a feed (for example, products). In this process, a pre-defined or automatically selected article template, including placeholders (DataKeys), is inserted into the container. The assignment of text snippets or images for the individual placeholders is done through a table (CSV file)
Set up screencast feed and create media source
Prepare upload files
IMDL-Templates
For a feed, a template with containers:
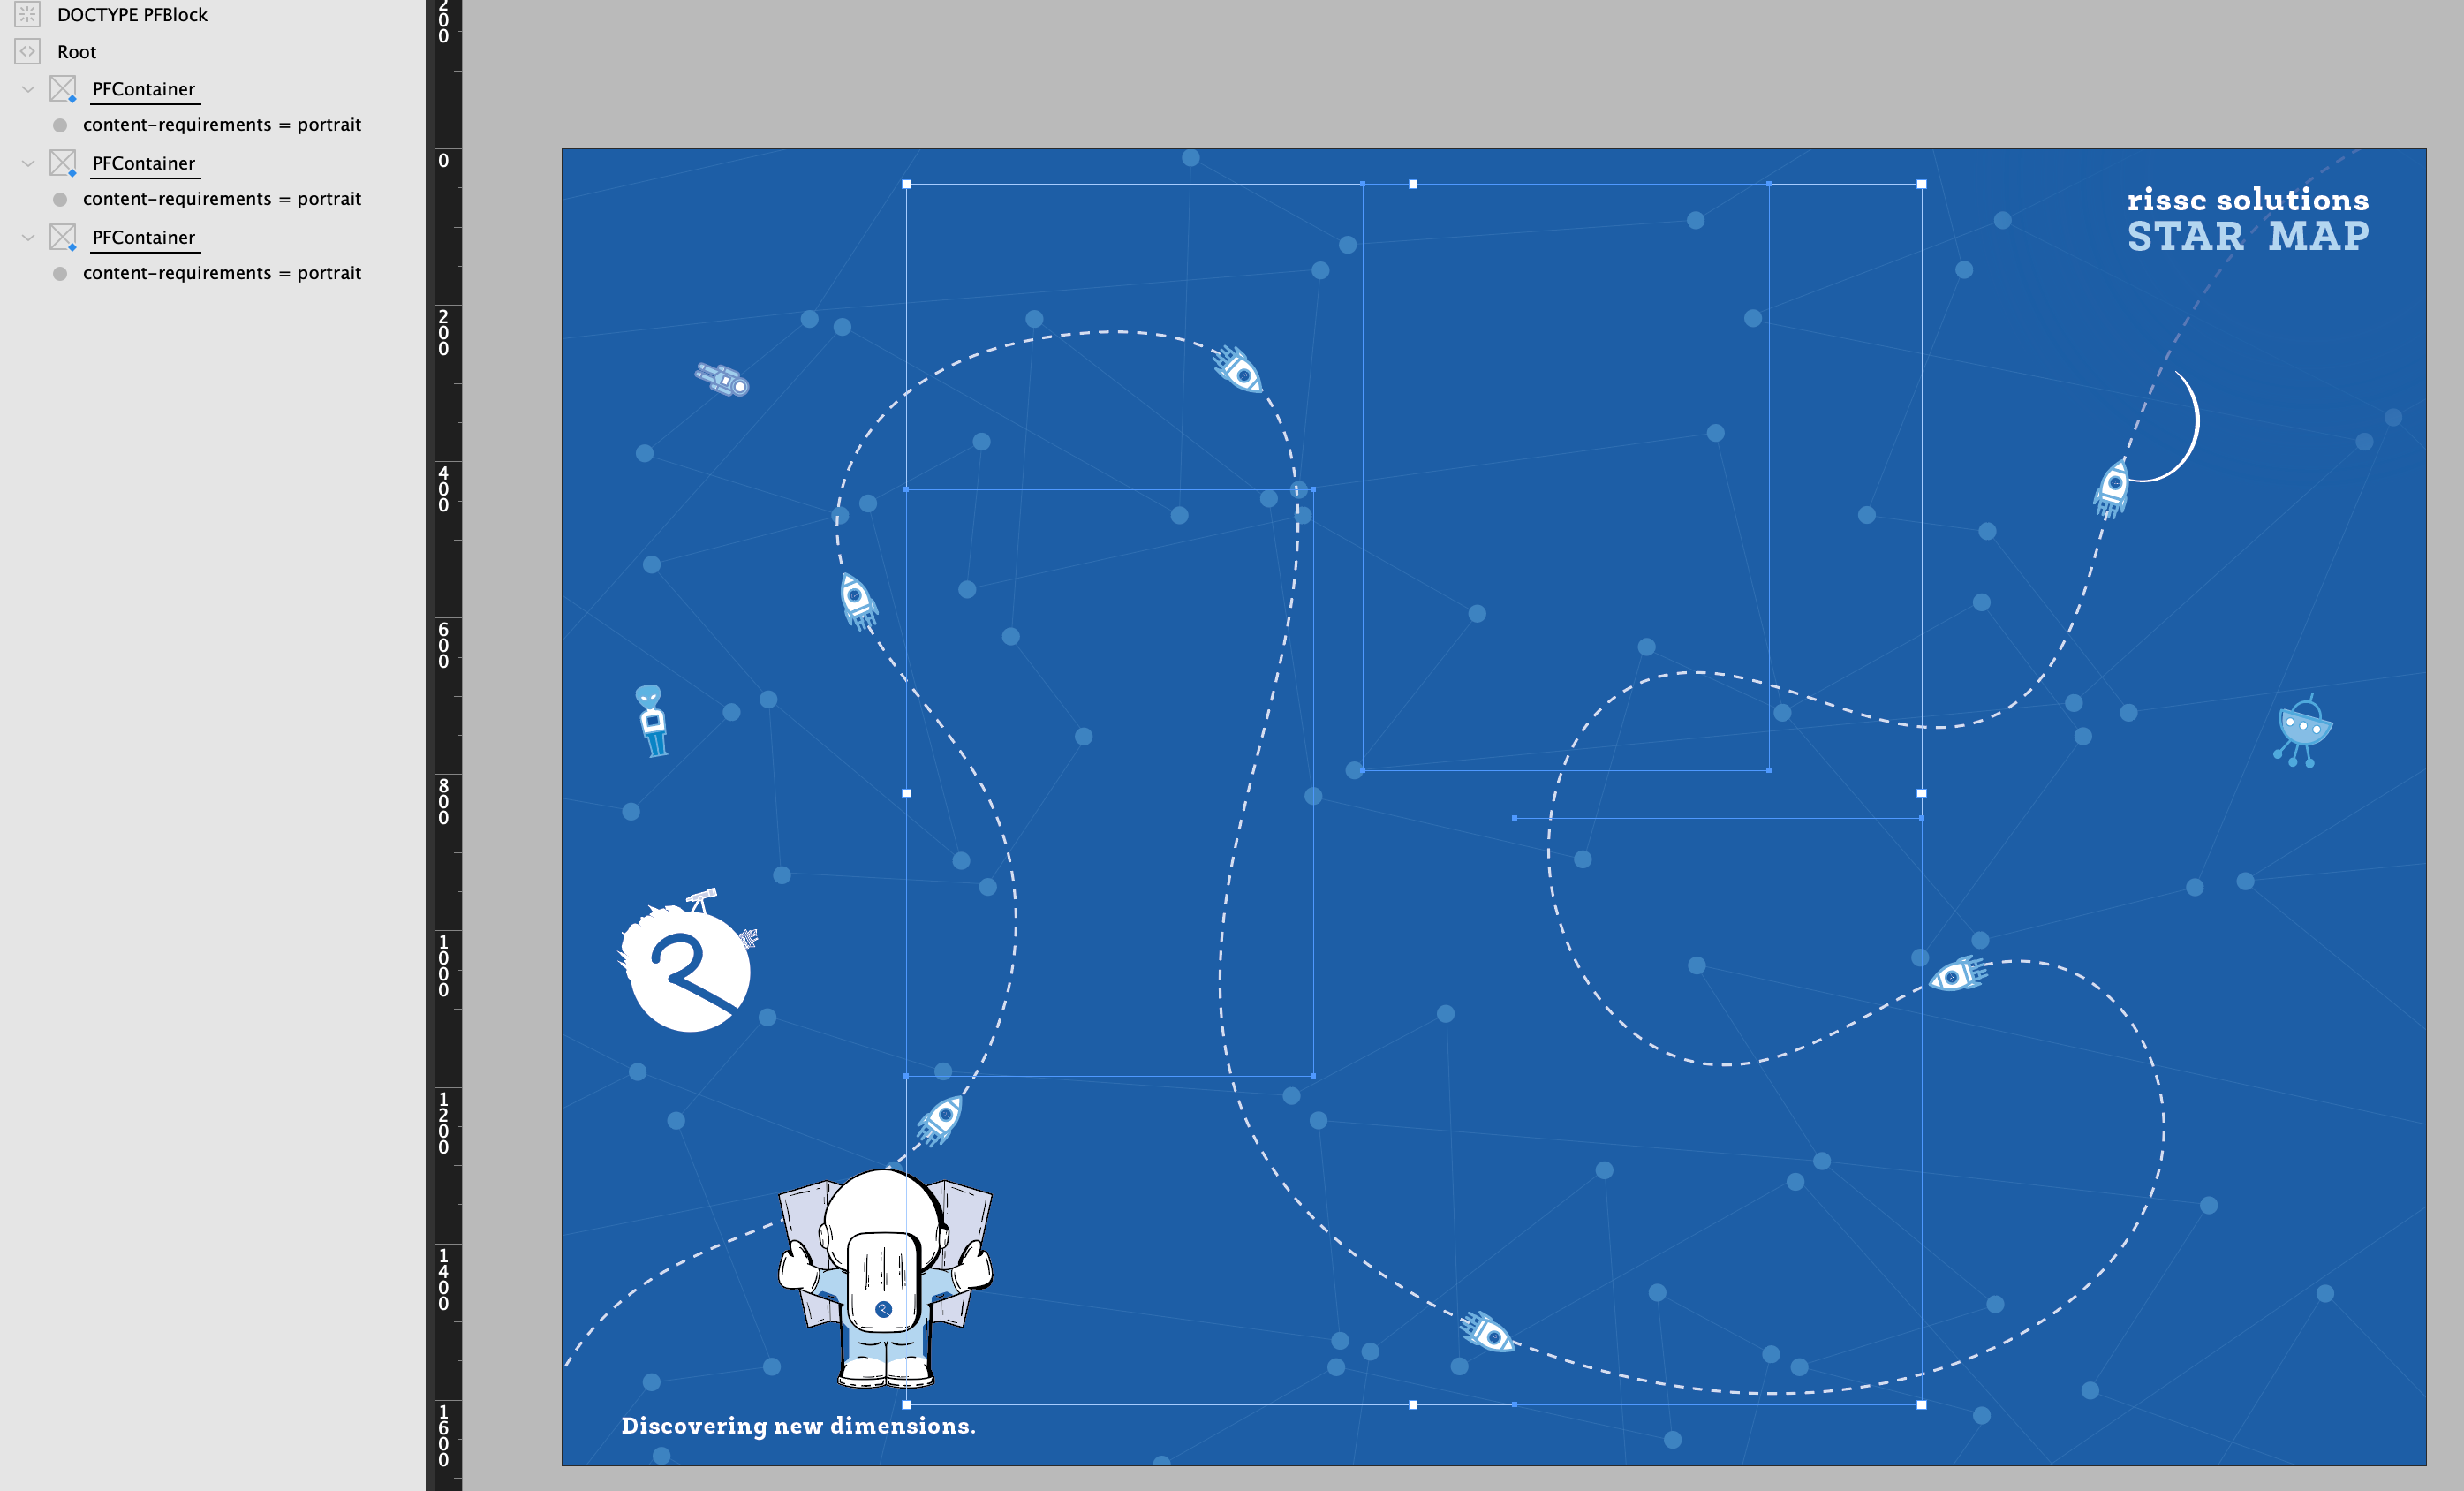
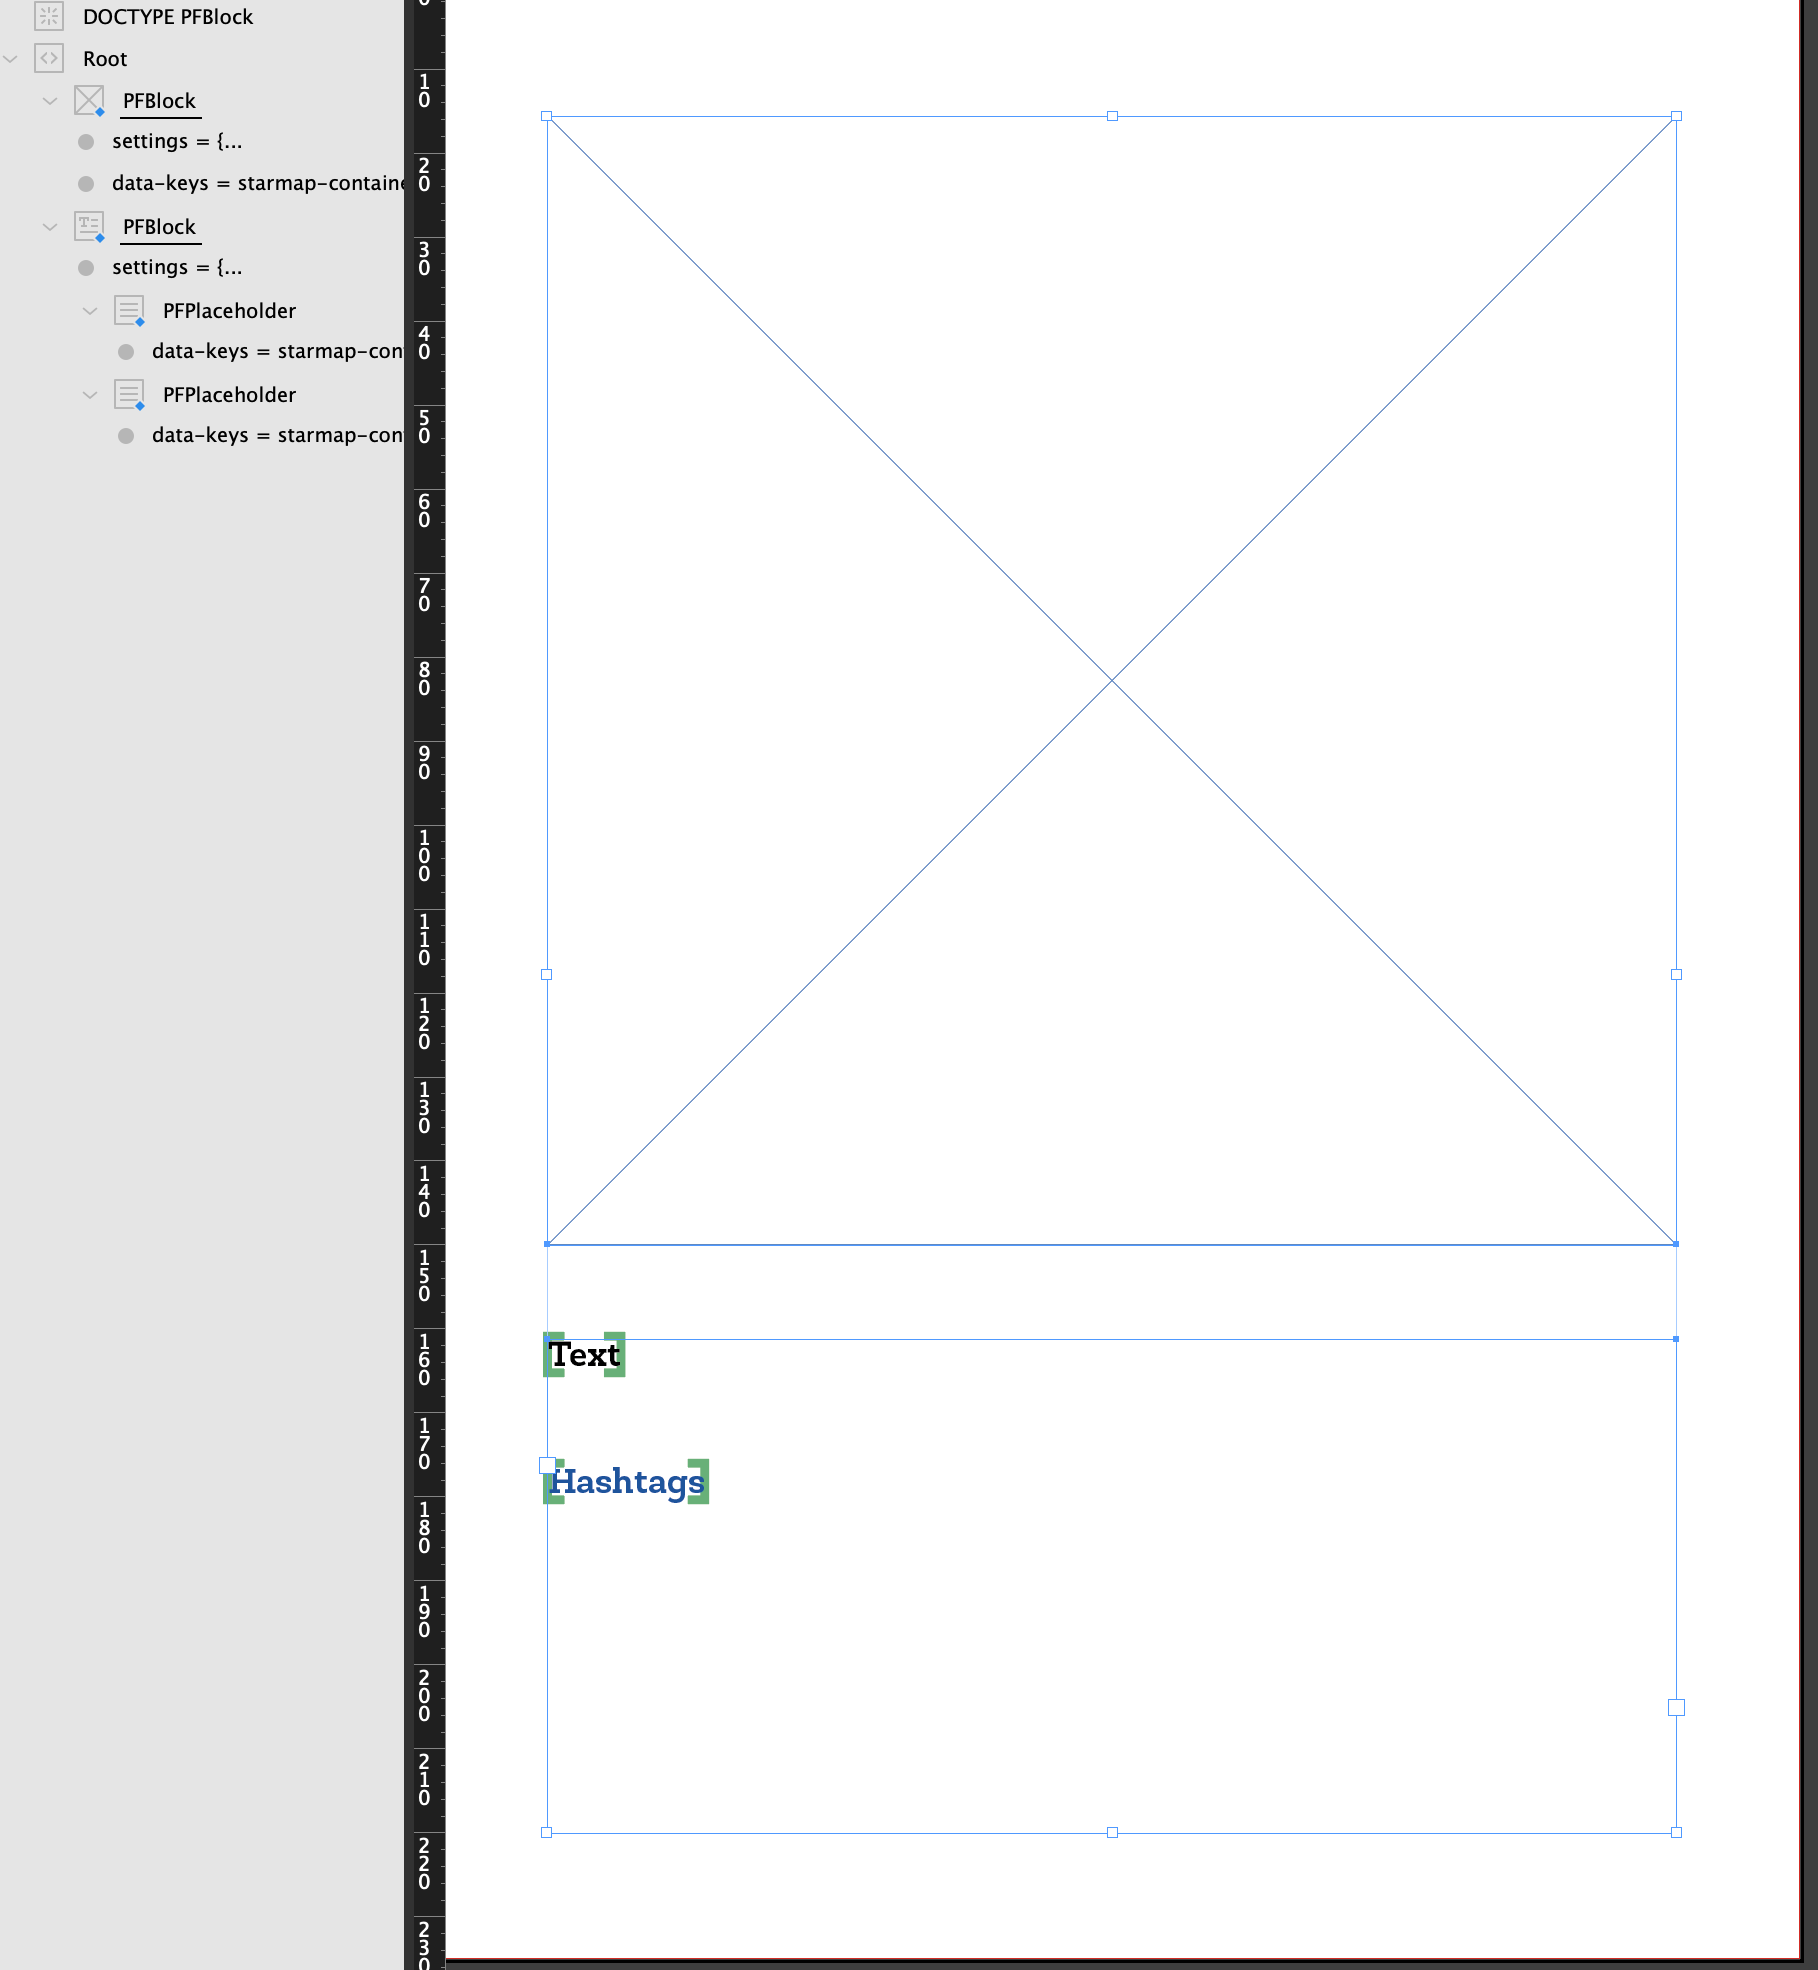
and at least one article template is required, with Placeholders for texts and images:
The image blocks that are filled using the feed must be empty.
(If an image has already been linked, it will remain for all data records).
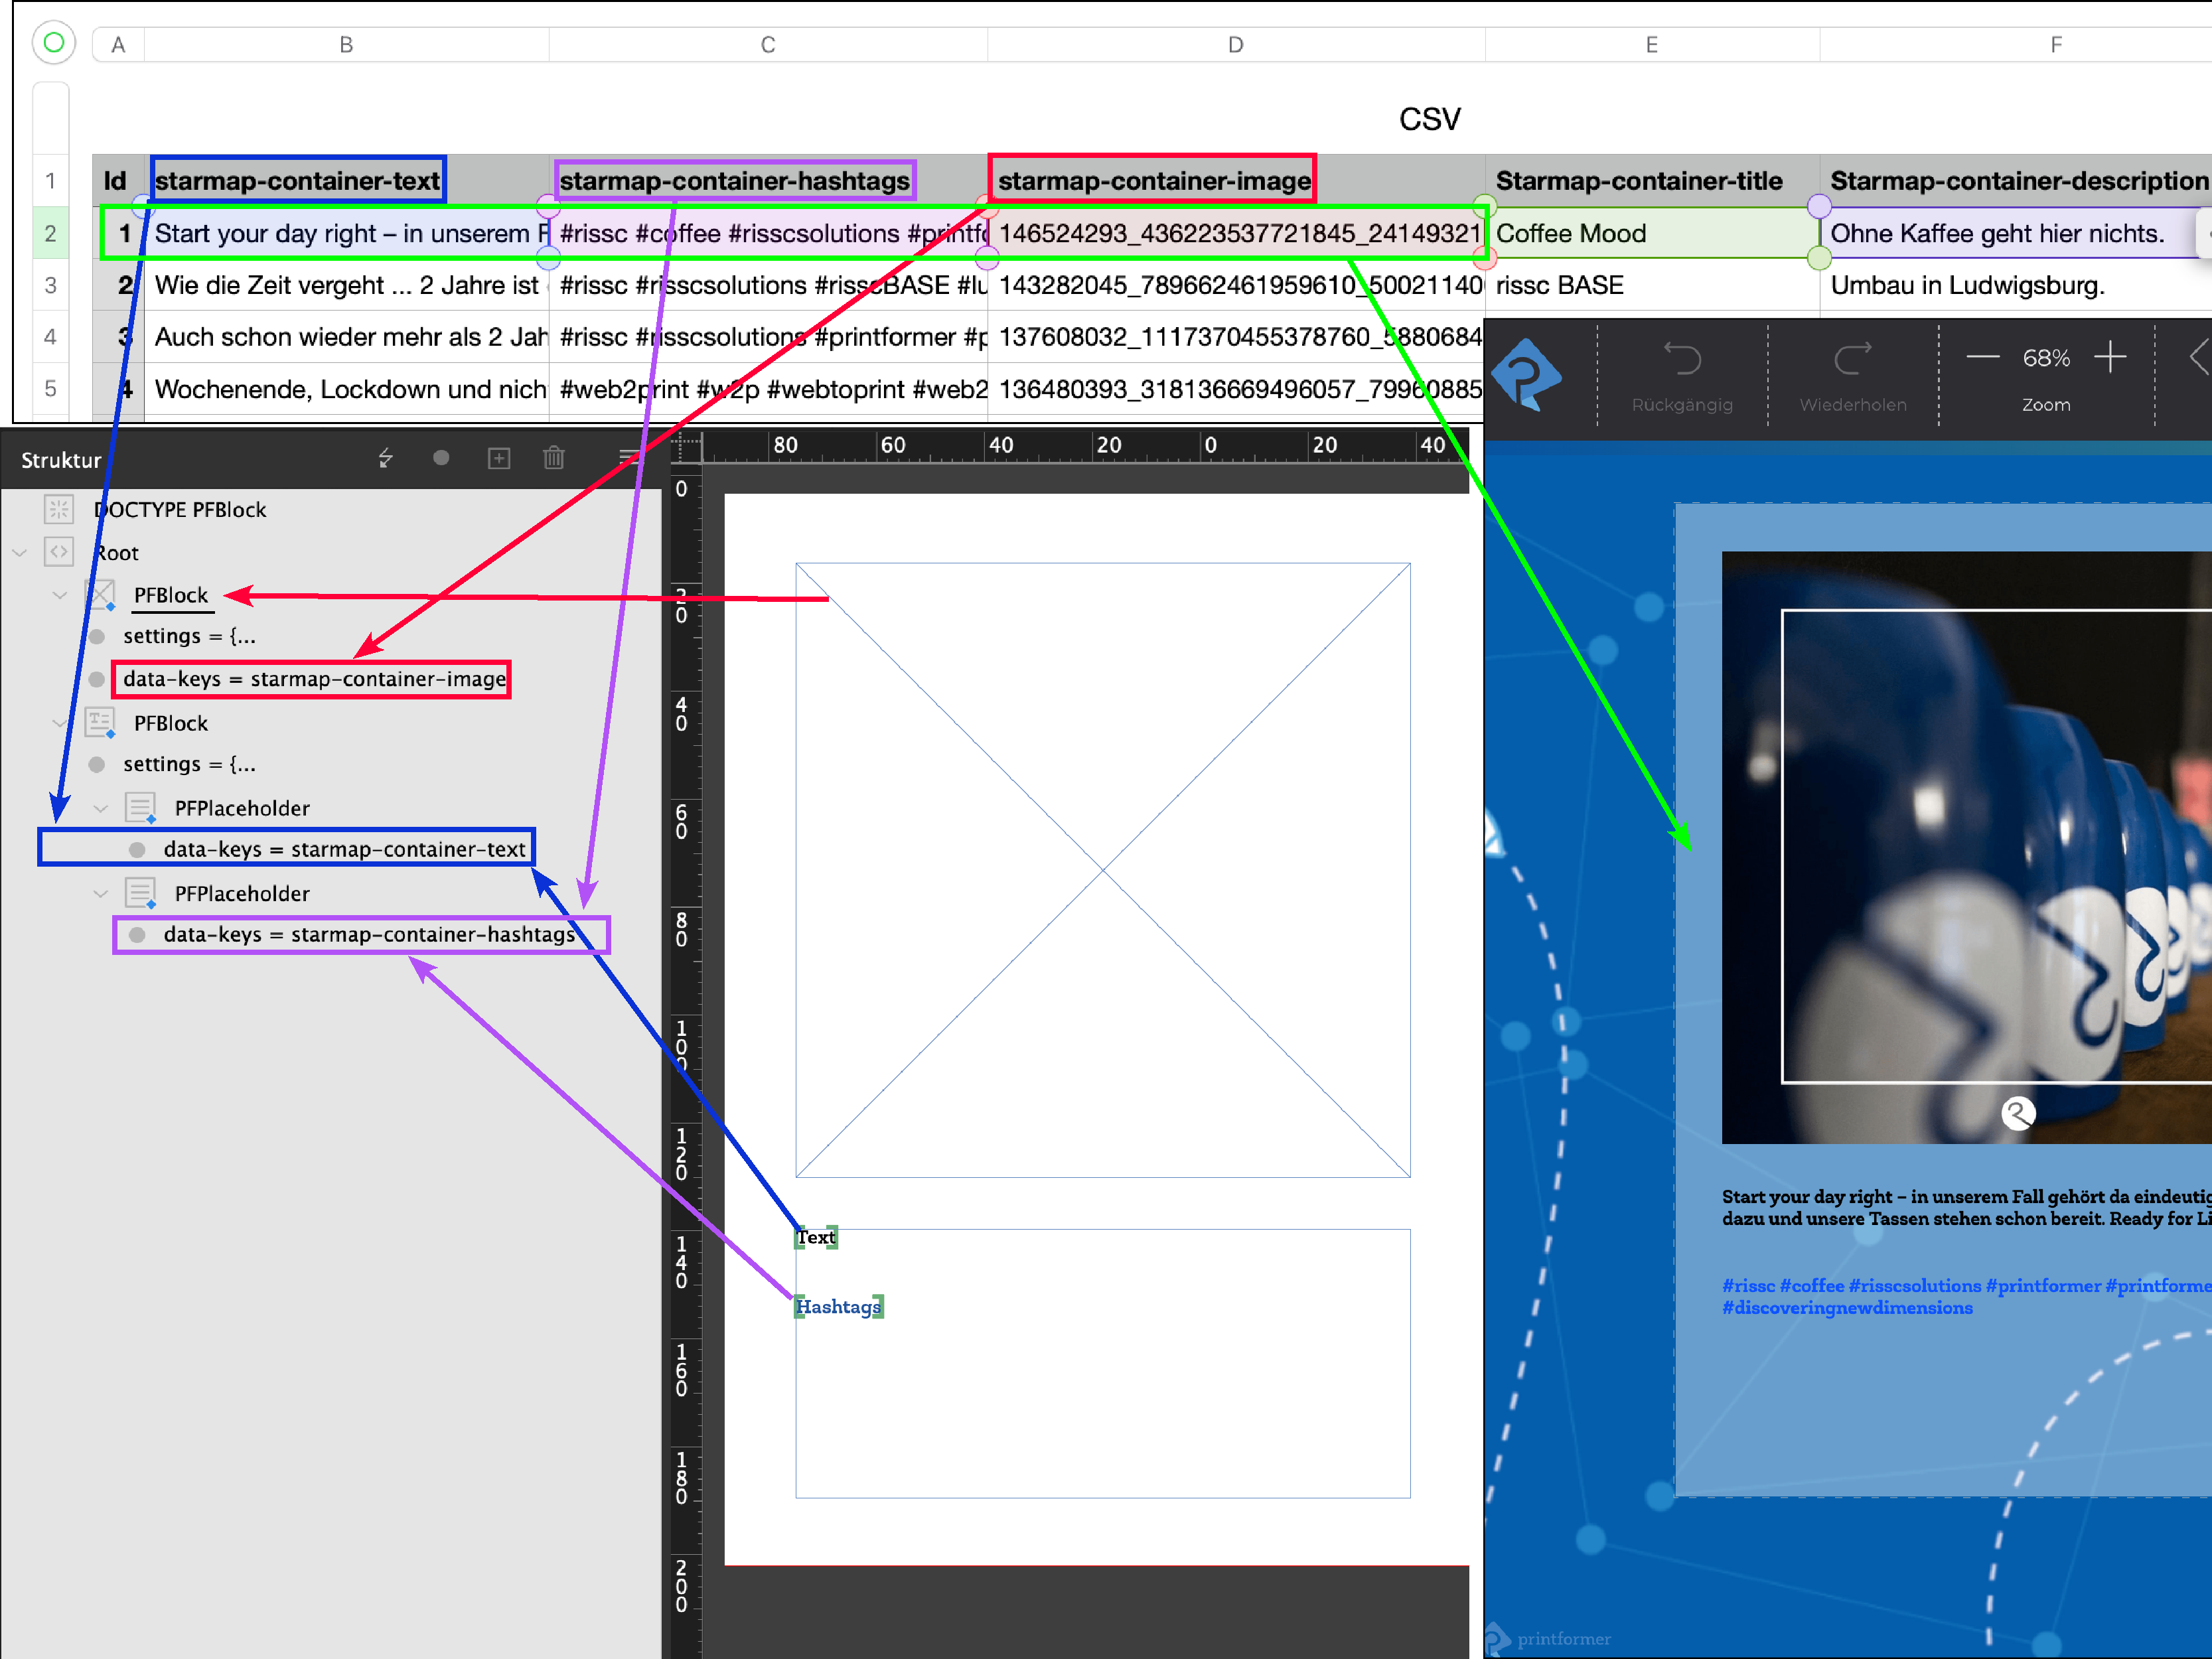
Feed File
The feed is created as a CSV file.
This file contains all the desired content, structured in columns (assignments) and rows (individual content).
For each text placeholder or image block placeholder in the article template, a separate column must be created. The column header must exactly match the data-key of the respective placeholder. The corresponding content is then added to the rows.
Images can be integrated in two ways:
System Media:
Images must first be uploaded to the system. In the CSV file, the full filename including the file extension (e.g.,image1.jpg) must be specified.External Links:
Alternatively, a direct URL to the image can be provided.
HTML formatting is supported.
If content is HTML*-formatted, the option Interpret HTML must be enabled in the feed configuration.
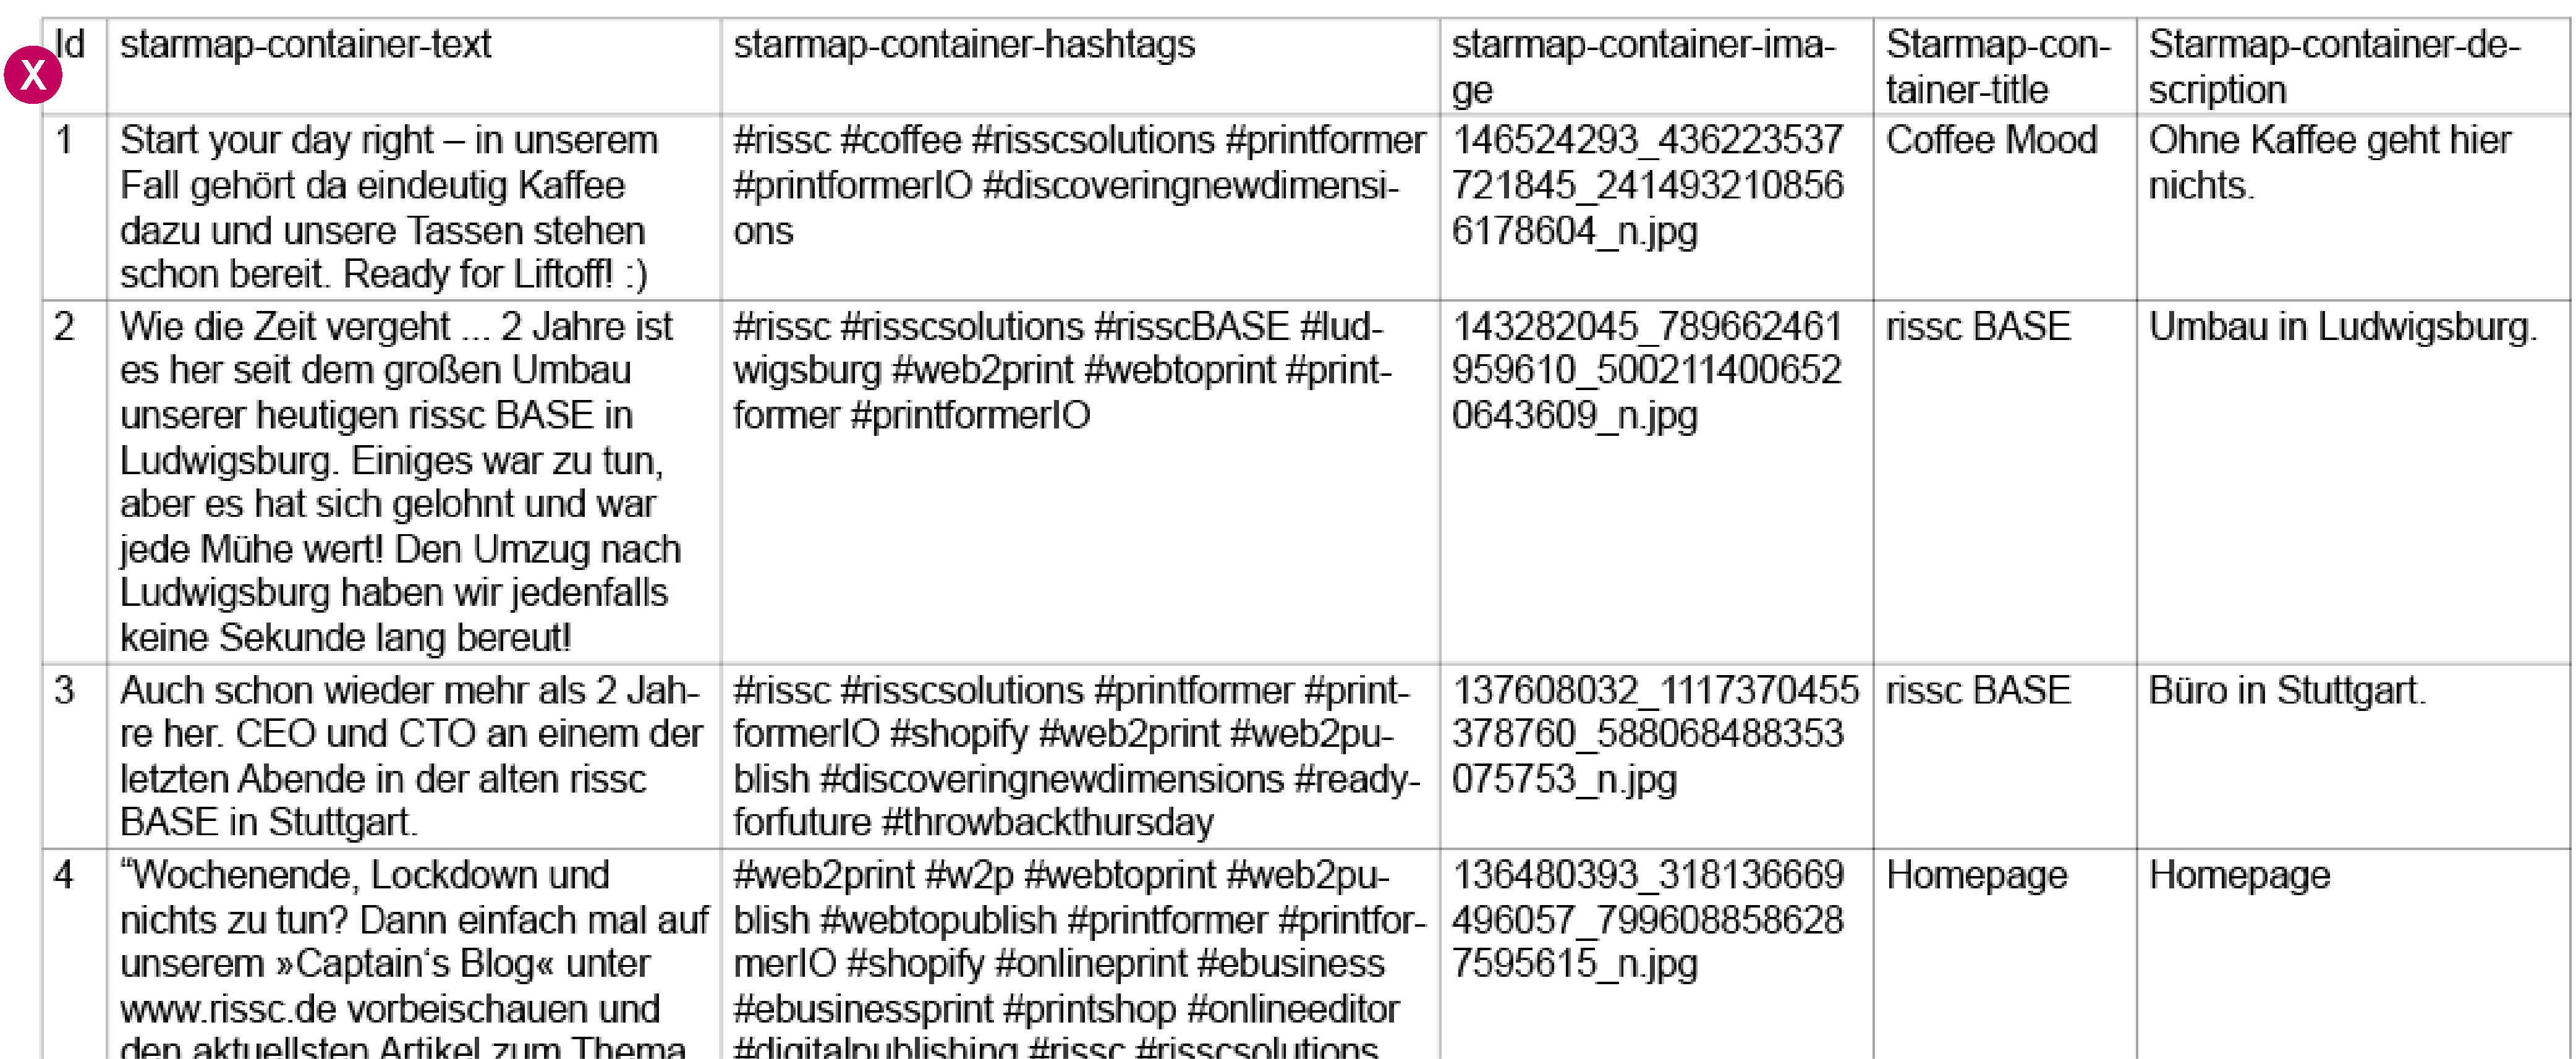
The CSV file must include an identifier column. (X)
This column is used to uniquely assign content (e.g., via an article number). Each entry in this column must be unique. The column header can be freely chosen and will be specified later in the configuration.
Note: For technical reasons, the column header must not be "id".
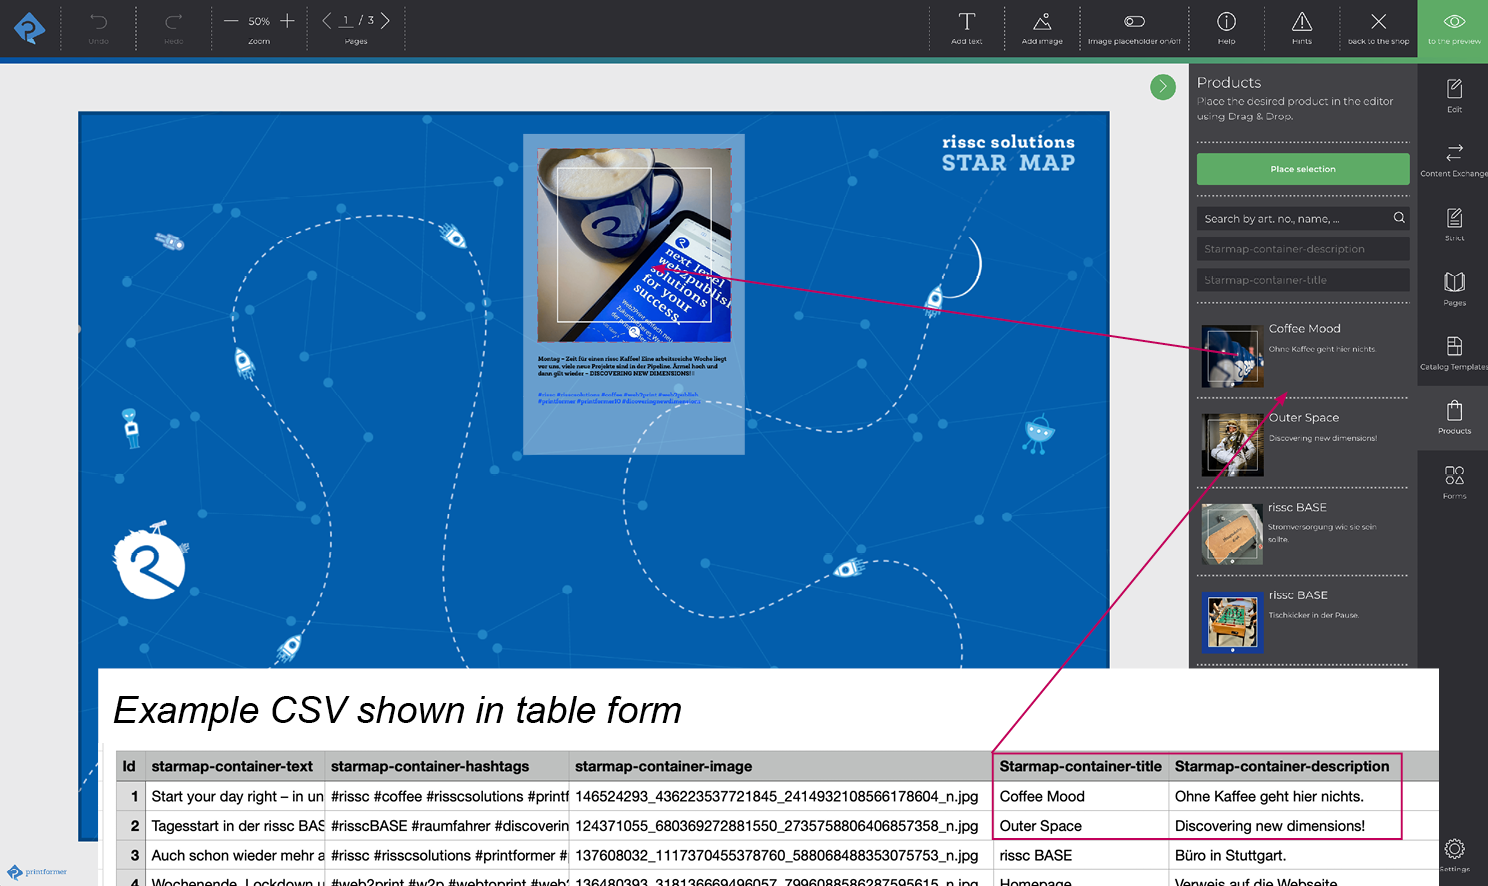
Example CSV shown in table form
Connection CSV file to template and editor
System settings
Feed-Mapping
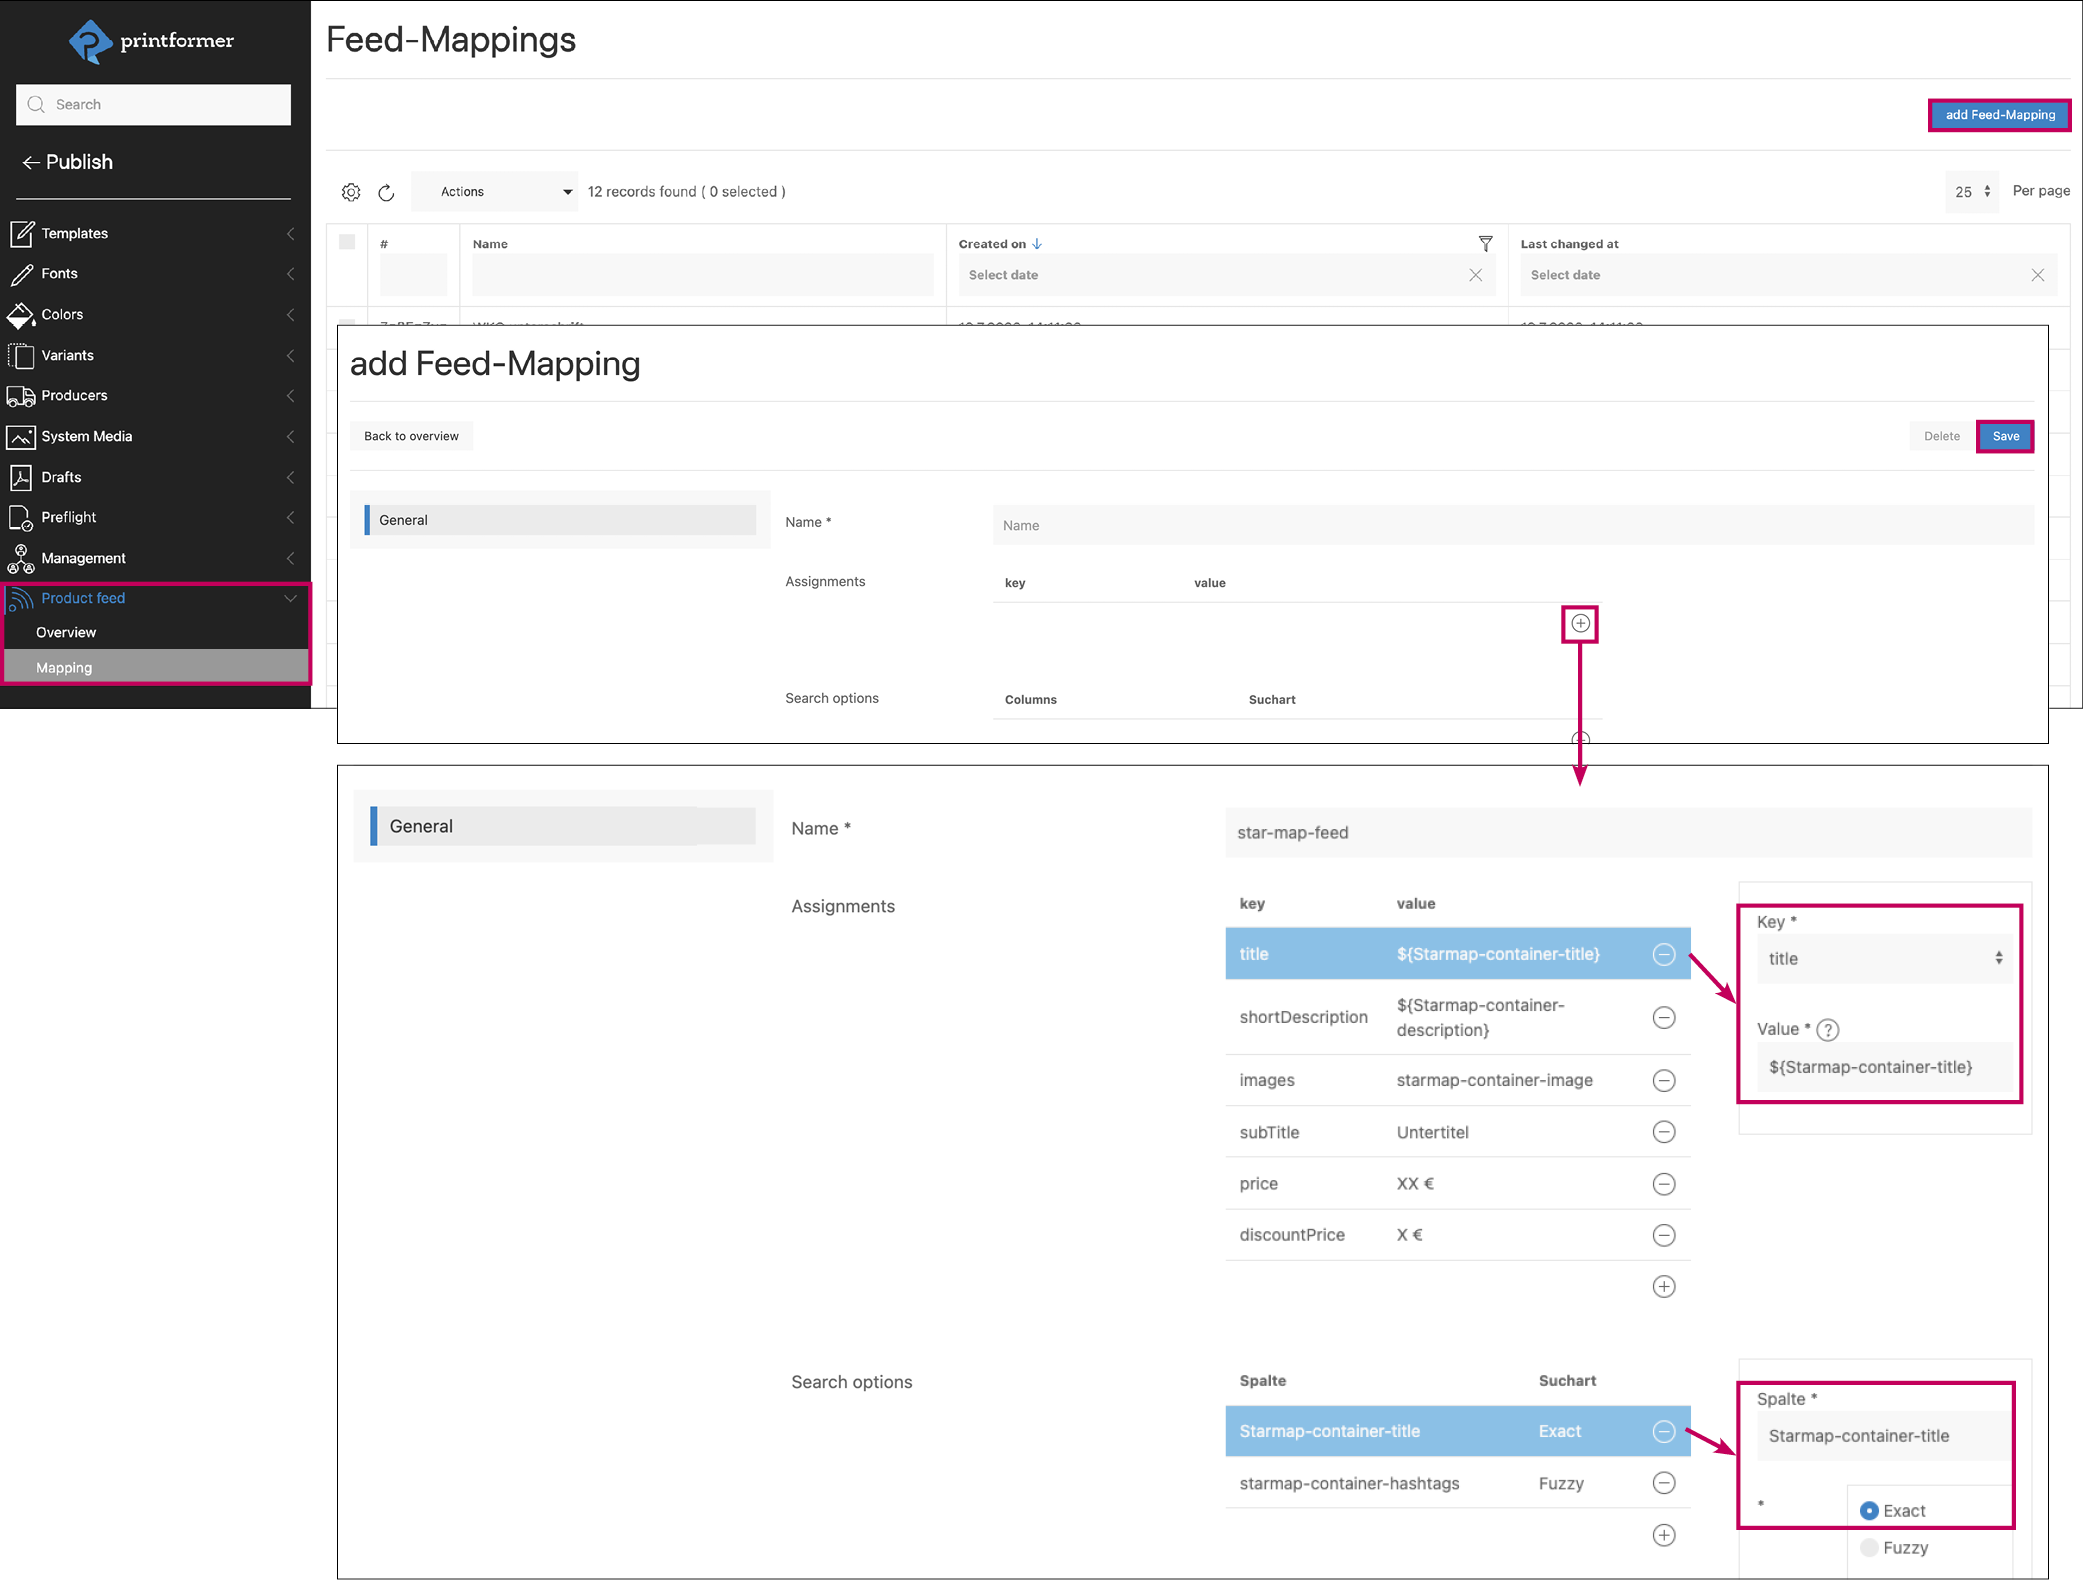
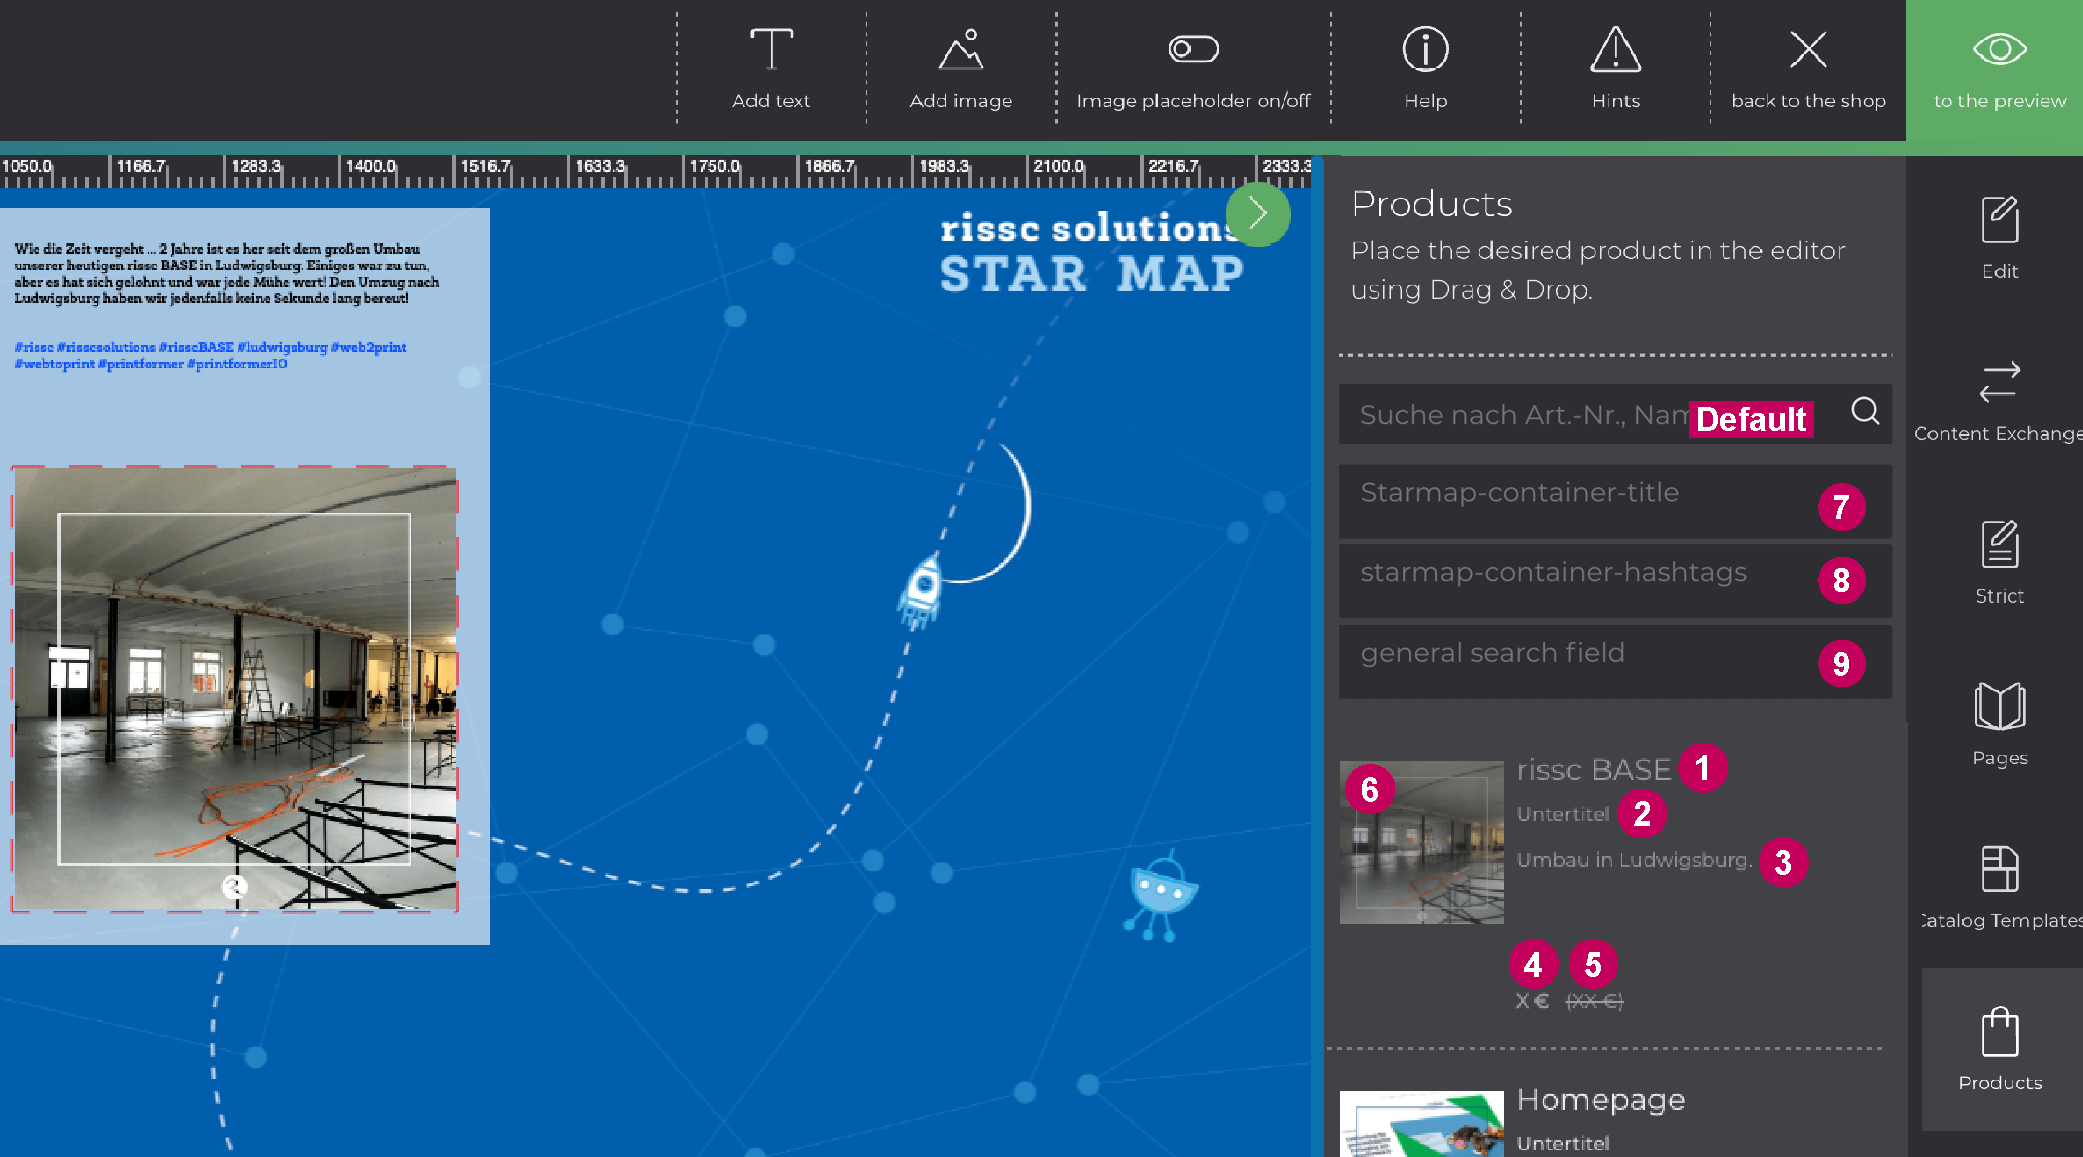
First, a feed mapping (Publish > Product Feeds > Mapping) is added. Here, it's determined how the individual products will be displayed in the Products menu of the editor's sidebar (see Example).
Initially, a name is assigned to the feed.
Feed Display in the Editor
Example Mapping in the Editor:
In the feed sidebar menu, multiple entries from the CSV file can be displayed. Additionally, search fields can be used to define various filter options to narrow down the data records as needed.
Creating Assignments for the Editor
Under Assignments, predefined keys are added and assigned a desired value. These keys control which texts and images are displayed in the editor sidebar for each product (see screenshot):
1 = title
2 = subtitle
3 = shortDescription
4 = discountPrice
5 = price
6 = image
In the Value field, the column name from the CSV file is entered. There are two formats for this:
For text placeholders (1–5):
${pf-ca-DataKey}
Here,DataKeycorresponds to the exact column name in the CSV file.
(Multiple data keys can also be assigned, separated by commas.)For the image (6):
column name
For theimagekey, the value must be the plain column name from the CSV file – without the${...}syntax.
For the "images" key, only the column name from the CSV should be entered as the value, received without ${...}
Configuring the Search Function in the Editor
By default, the product menu in the editor includes a search field that allows users to search by article number, name, and product identifier.
Without any custom configuration, this field only searches the following keys for exact matches:title (1), subtitle (2), and shortDescription (4).
Advanced Search Options:
Additional search fields can be defined (see screenshot 7 and 8).
These allow for more targeted searches and are each based on a single column from the CSV file.
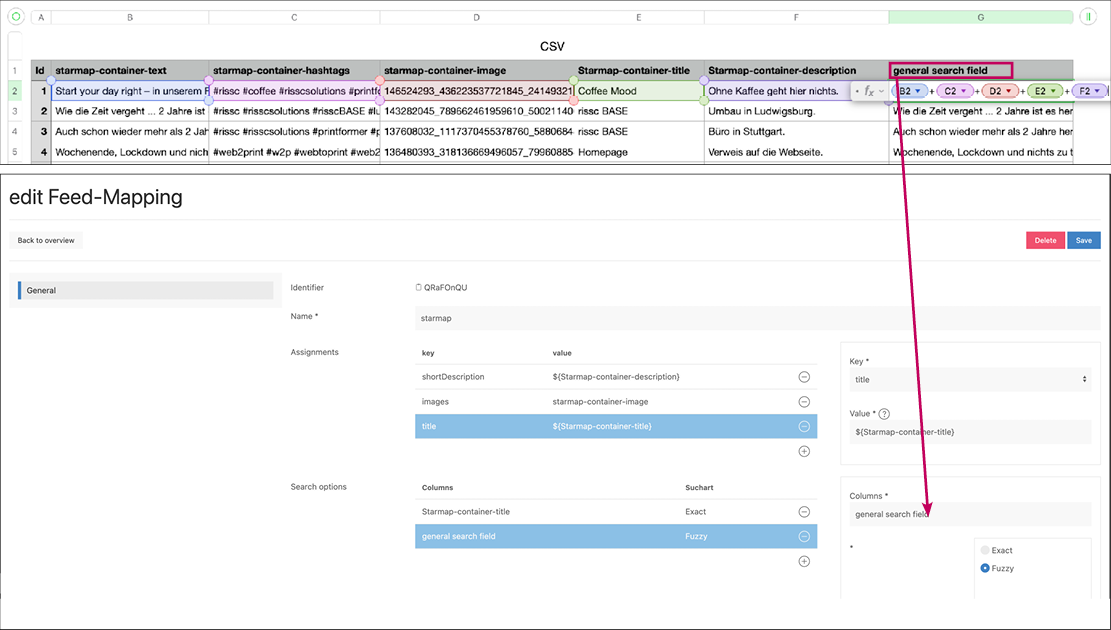
Note on multi-column search:
If you want to enable a search across multiple content fields (see screenshot 9), an additional column must be created in the CSV file. This column should combine all relevant content from other columns.
It can then be used as the basis for a combined search field within the editor.
Through the feed settings, the default search can be hidden, allowing only the search fields created in the mapping to be visible in the editor.
The search type can be distinguished between Fuzzy and Exact: Fuzzy performs a wildcard search for the search term, while Exact looks for only the exact term (for example, searching by item number). If nothing is specified, the search field in the editor will only search for exact matches in the keys: title, subtitle, and shortDescription (default behavior).
Feed setup
To set up the feed (Publish > Product Feeds > Overview > Add Feed), you'll enter the name, type, and optionally, the clients.
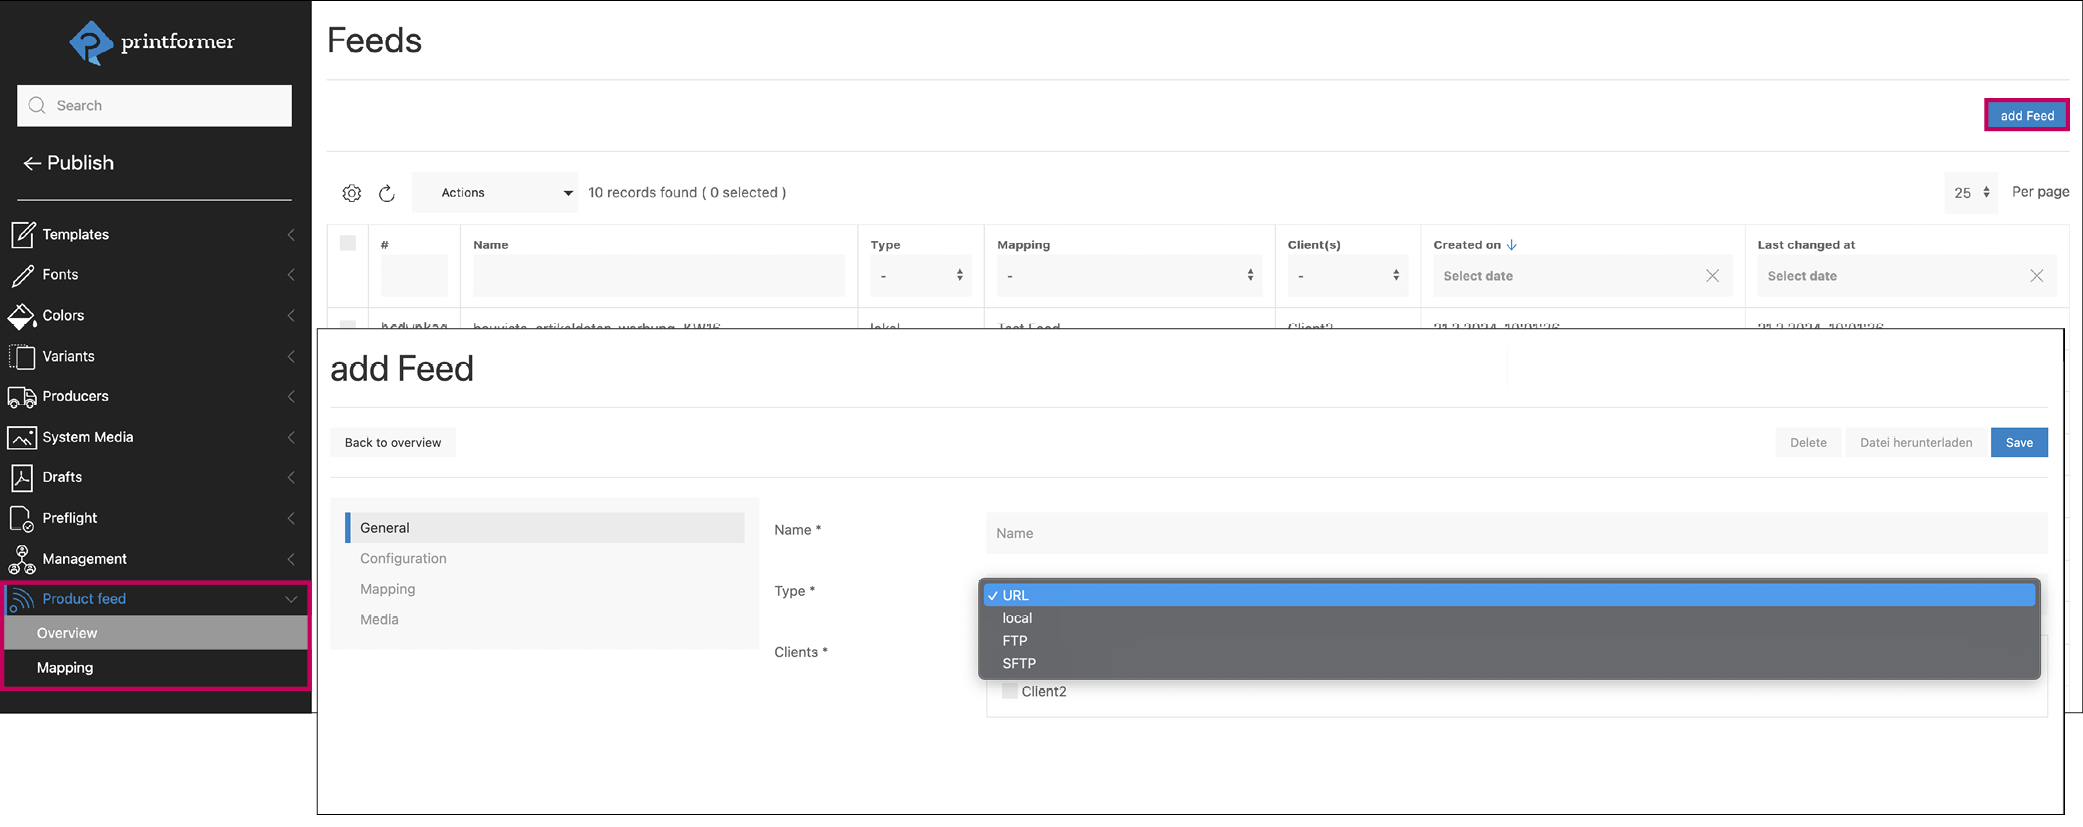
Setting | Description | Fig. |
General | Specify name, type and, if applicable, clients | |
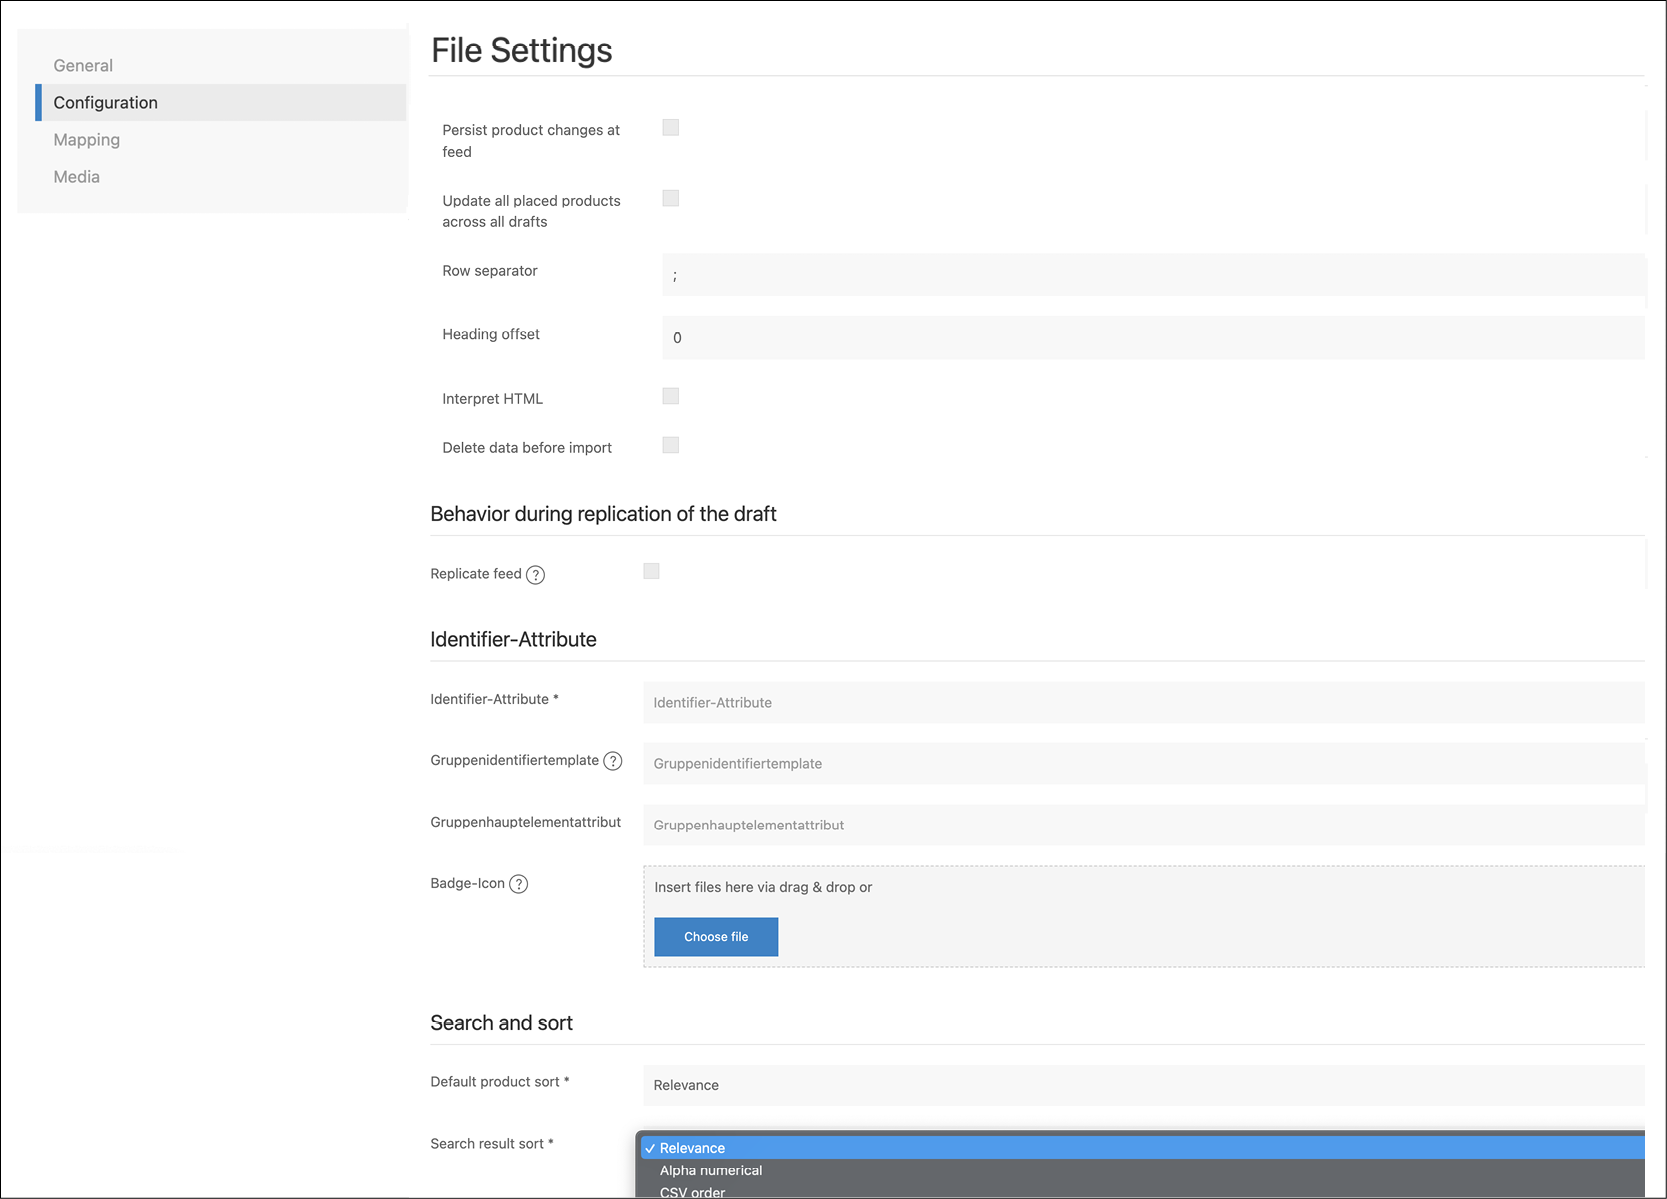
Configuration | ||
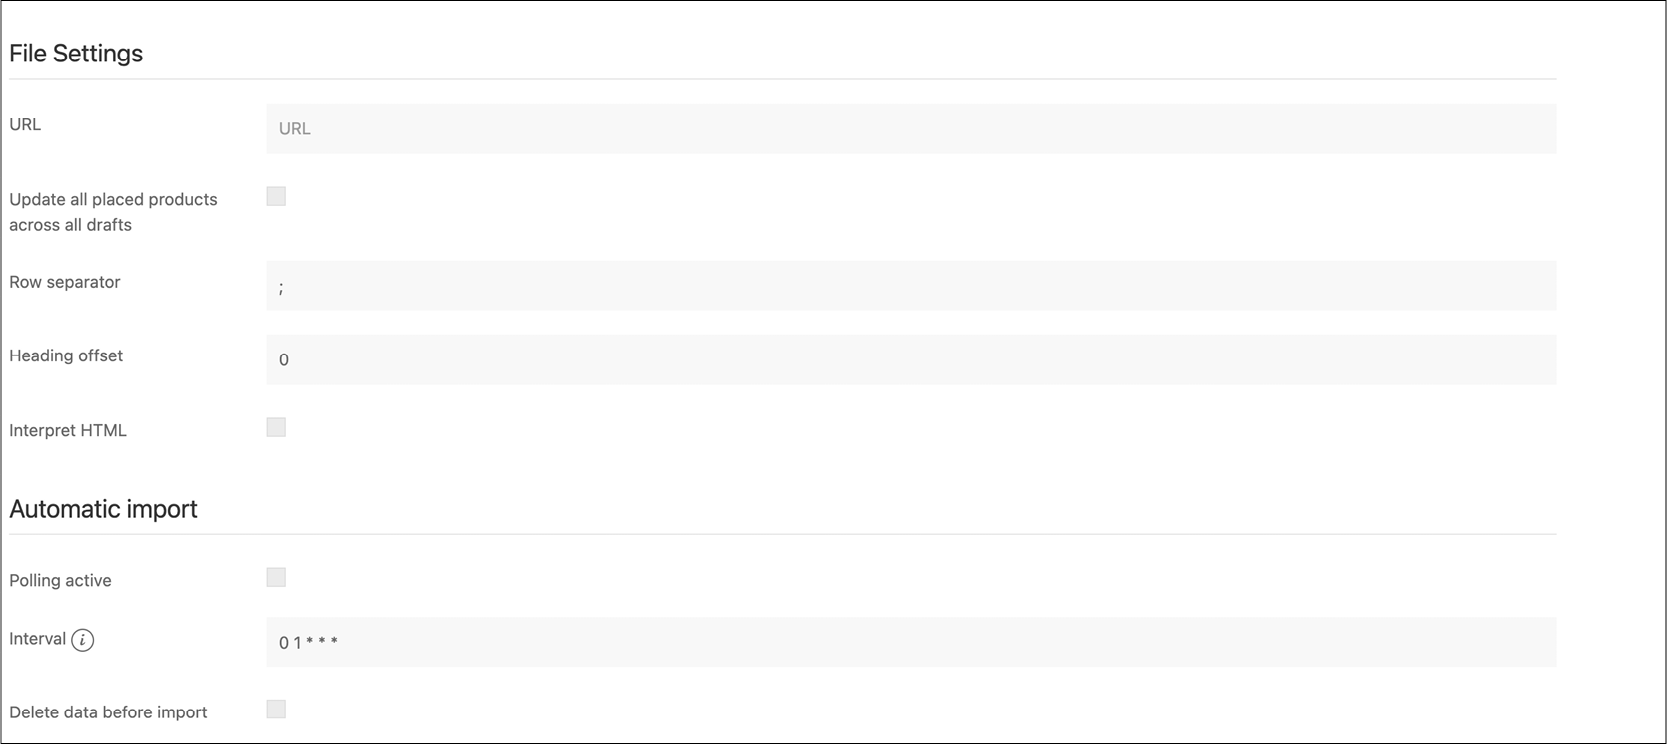
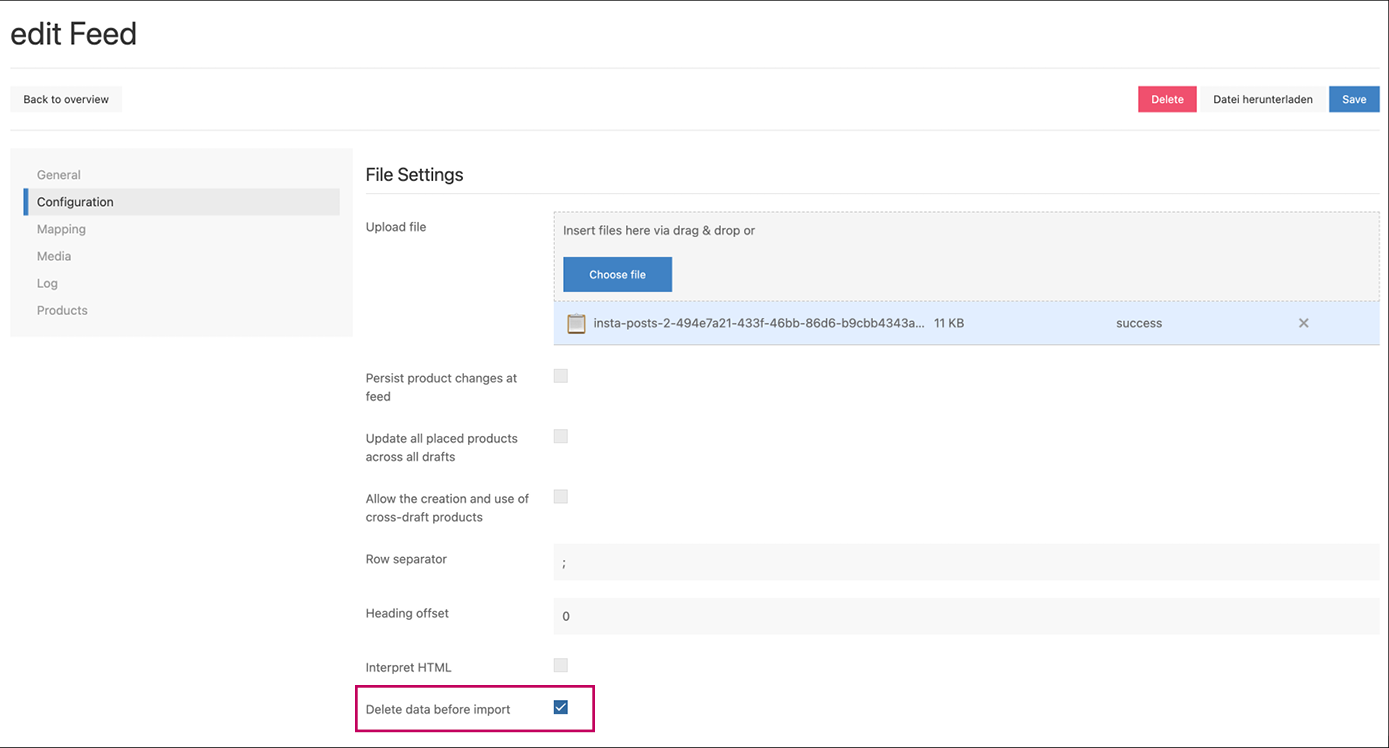
File Settings |
|
|
Persist product changes at feed | Changes made to individual products in the editor are automatically saved to the feed. |
|
Update all placed products across all drafts | Product customizations in the draft also take effect in other drafts as soon as this editor is opened or the print file is regenerated. | |
Allow the creation and use of cross-draft products | If this checkbox is activated, the user can create their own products in the editor and save them permanently to their profile. These products are then also available in new drafts. (Own products do not affect the feed and can otherwise only be saved on a draft-related basis). | |
Row separator | Separator of the CSV file (e.g. ; ) |
|
Heading offset | in which line are the headings (usually always the first line, which is specified as 0) |
|
Interpret HTML | the checkbox can be used to determine whether HTML* (from the file) should be interpreted or removed |
|
Delete data before import | This checkbox must be activated if the existing data records in the feed are to be deleted or replaced when replacing the CSV file (e.g. during an update) for the feed or if Polling (for the FTP/sFTP type; URL) is activated. |
|
Behavior during replication of the draft |
| |
Replicate feed | Special Feature: If there is no specific use case, this checkbox should be deactivated. |
|
Identifier-Attributes | ||
Identifier-Attributes* | Column title of the identification column (this column is used to identify the individual data records - it is required to be able to clearly assign content. For technical reasons, “id” may not be used as a column title |
|
Group identifier template |
| |
Group main element attribute |
| |
Badge-Icon | An SVG file (scaling 3:4) can be uploaded here as a markup element for certain products in the editor (sidebar tab Products/Placed products, see screenshot below). | |
Search and sort | The display of the products (with or without search filter) can be sorted alphabetically, by relevance or by the order of the CSV file. Additional fields can also be entered. |
|
The "Delete data before import" checkbox must be activated if, during the replacement of the CSV file (for example, during an update) for the feed, the existing records in the feed should be deleted or replaced, or if polling (Type FTP/sFTP; URL) is activated
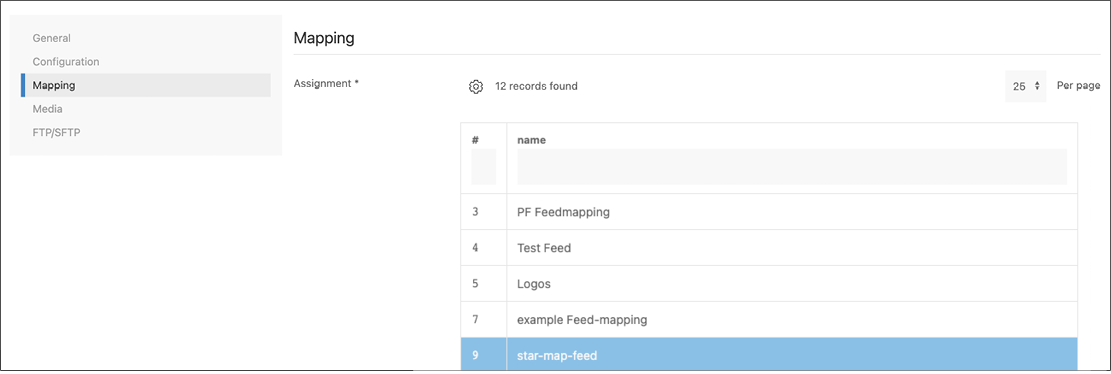
Mapping
Under Mapping, the previously created Feed Mapping is assigned.
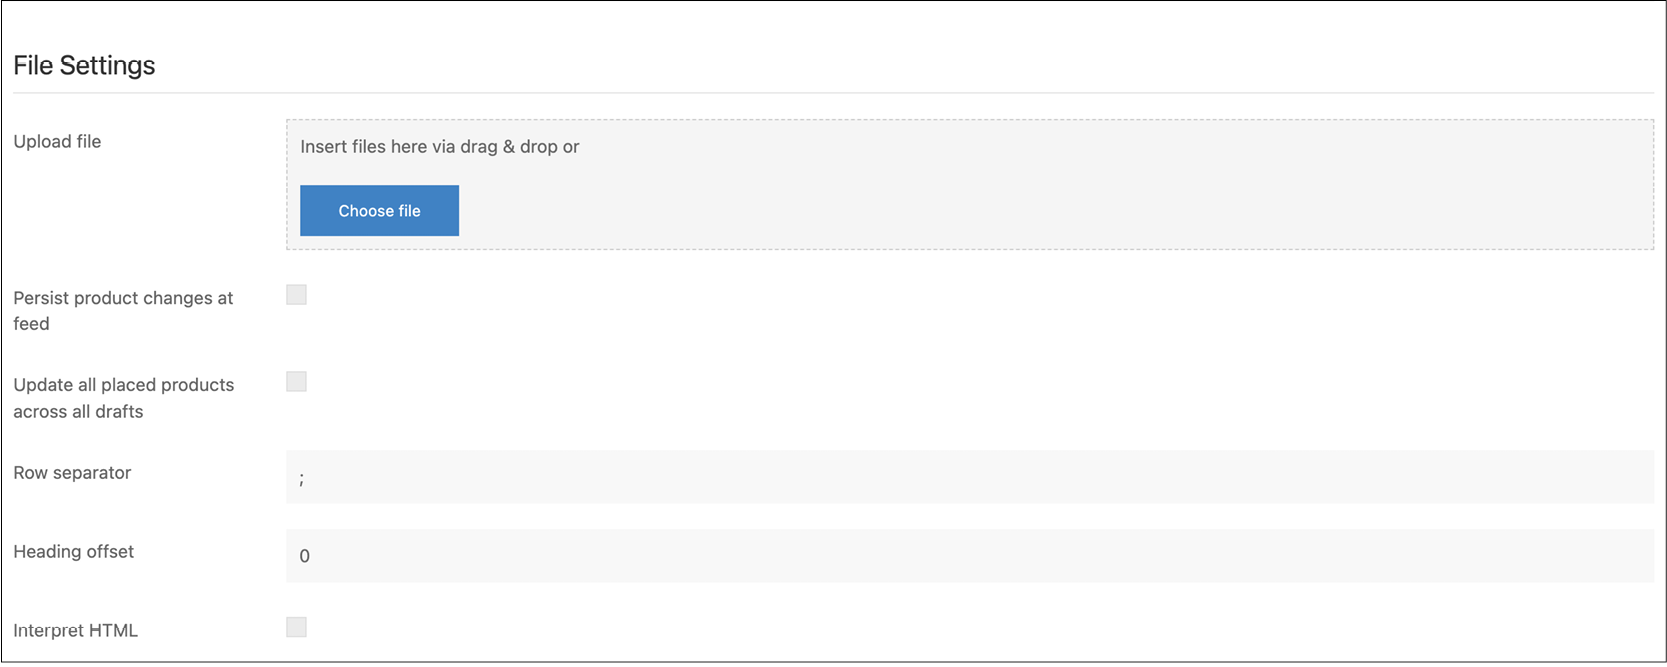
Media
If the feed accesses media, you'll activate the checkbox here and select the desired provider.

Setting | Description |
Media active | Checkbox must be activated if images are to be loaded via the feed |
Load media only when in use | to optimize performance |
Provider |
Export 
![]() Special Feature therefore not relevant for the configuration.
Special Feature therefore not relevant for the configuration.
Log/Products
When you save, the data is sent to the Feedcon. Under Log, you can review the responses from the Feedcon. If it says "success," the feed was created successfully; otherwise, an error message will appear.

Feed Types
Type local
The feed (CSV) file is uploaded here first.
Type URL
Here, you'll enter the desired URL (link to the CSV, for example, https://example.com/my-feed.csv).
If this configuration is used, it's important to note that the URL must be accessible and retrievable multiple times.
Type FTP/SFTP
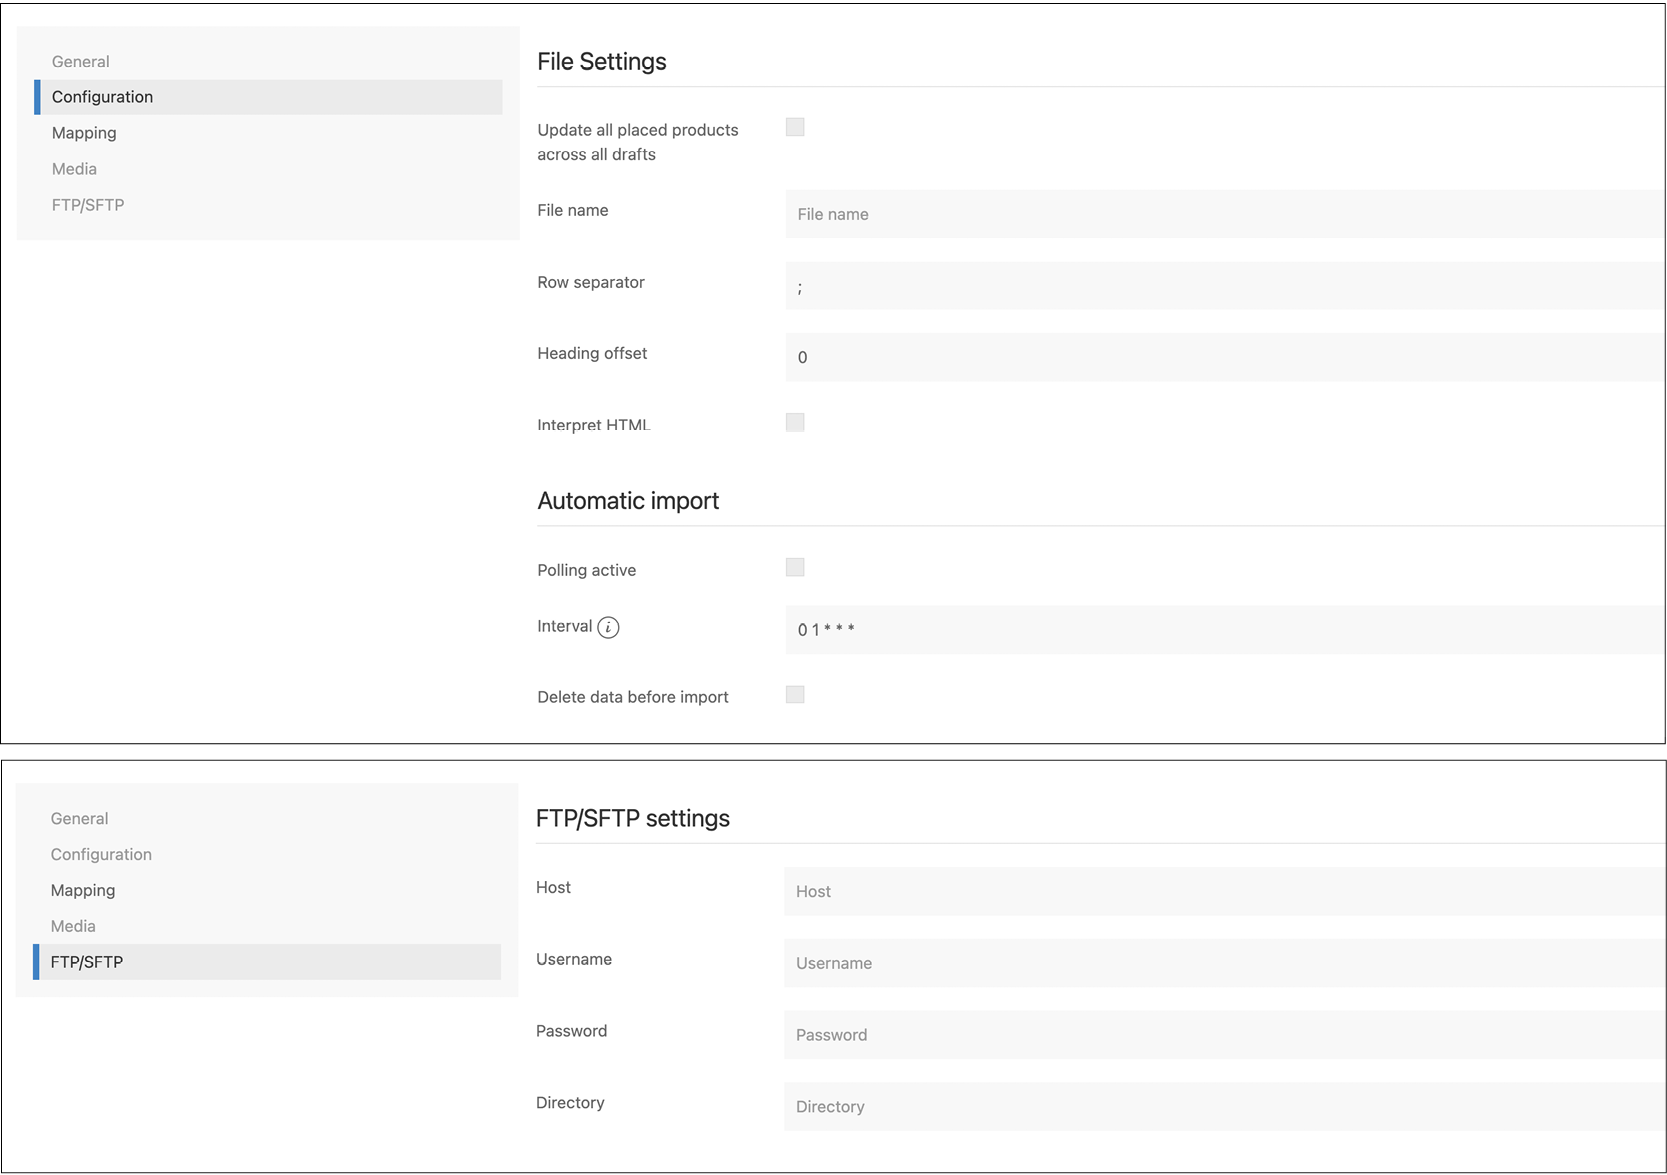
The FTP/SFTP type operates on the same principle as the URL. You enter the filename of the CSV and provide details for automatic import, along with the FTP/SFTP settings (credentials and directory path on the FTP server).
Automatic Import
If the polling checkbox is activated, the data for the feed (FTP/SFTP or URL type) will be automatically retrieved once daily at the specified interval. The interval field uses a Cron expression and only accepts Cron inputs. The default is 0 1 * * *, equivalent to every day at 1 AM.
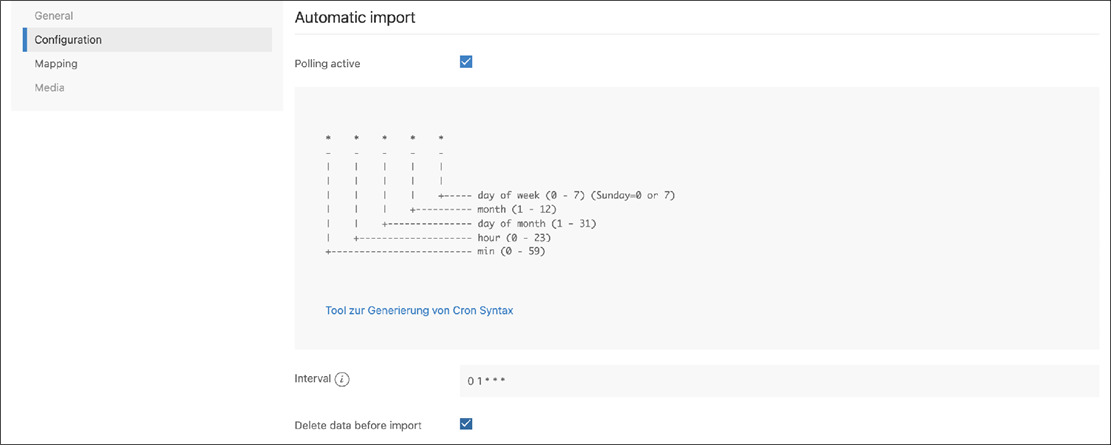
To ensure that the old feed not only expands but also potentially deletes records no longer present, the "Delete data before import" must be enabled.
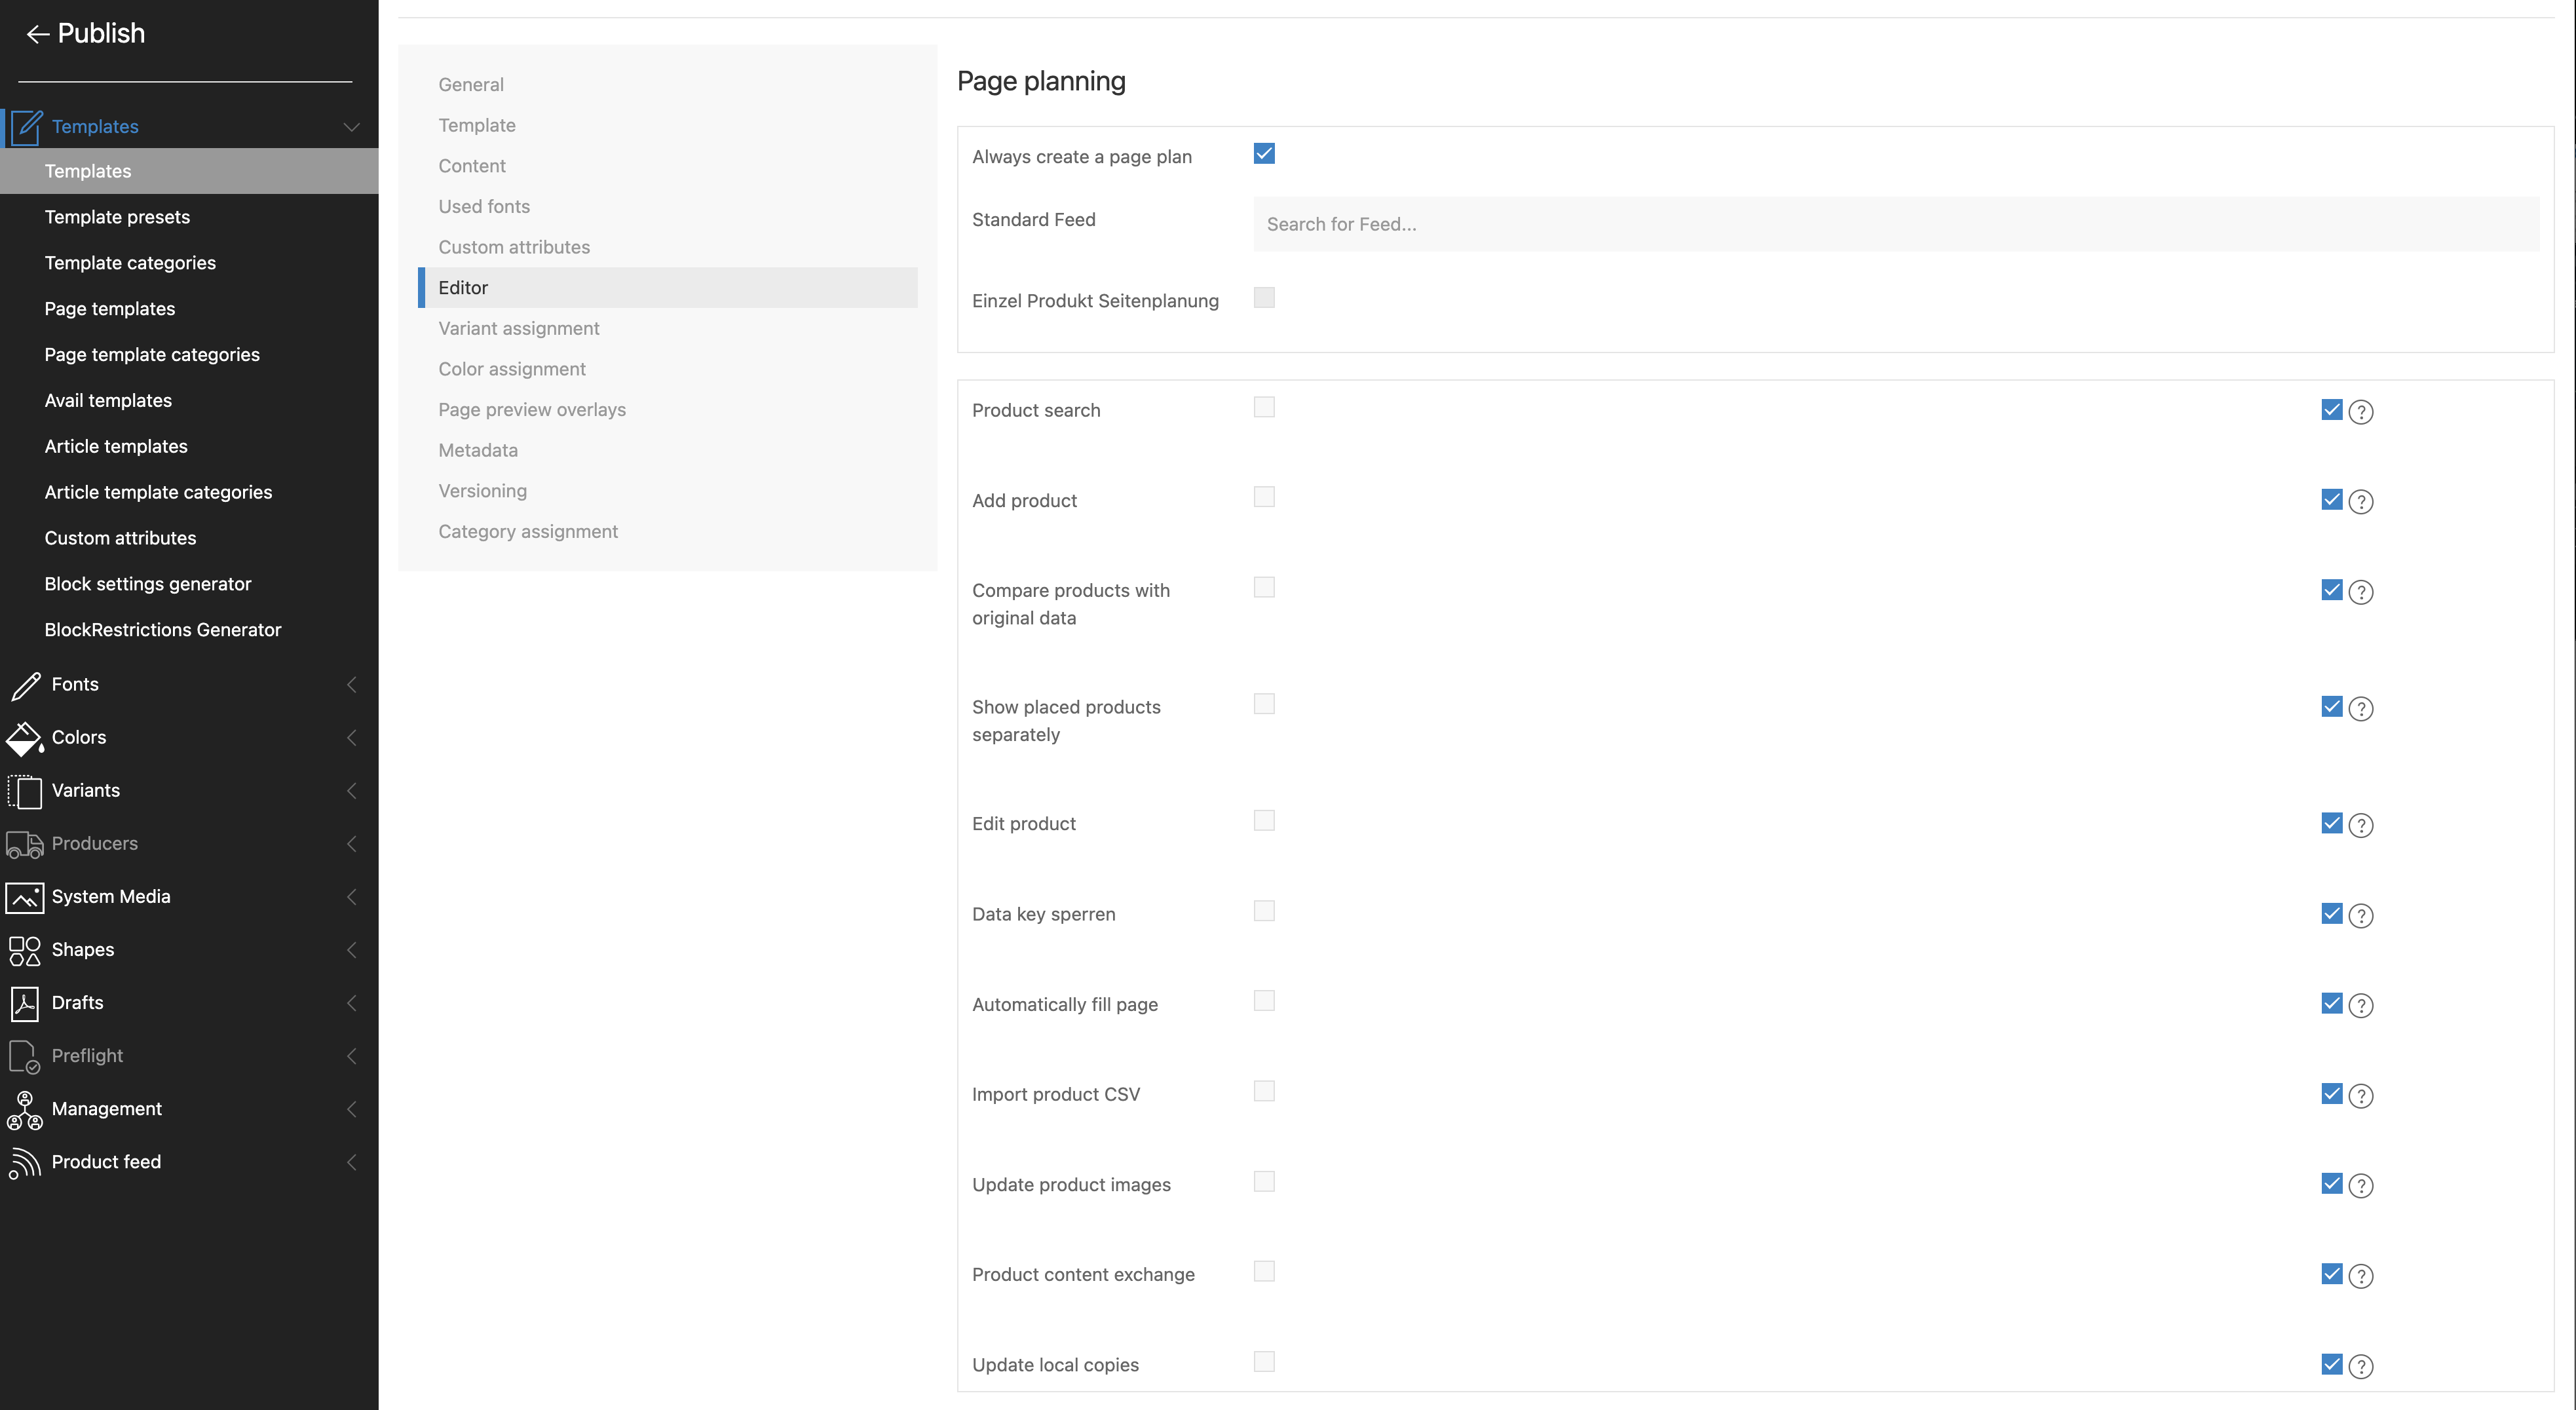
General Settings
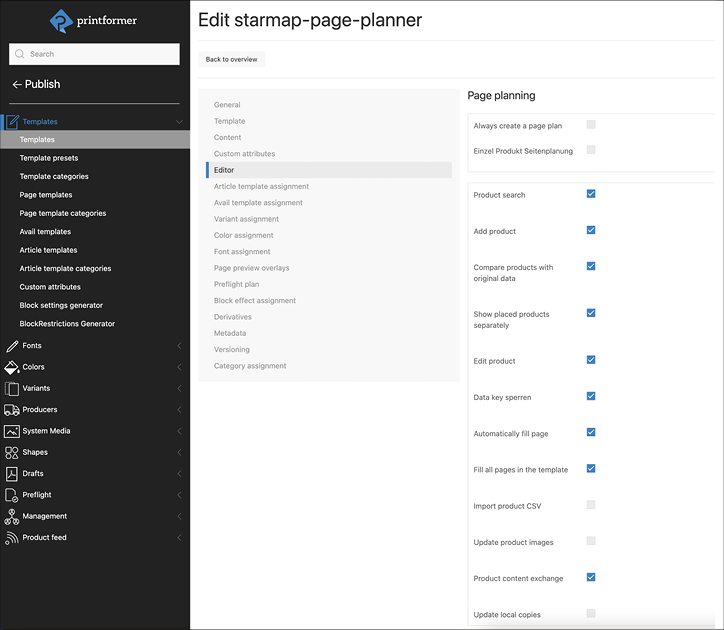
Further settings for the Product Feed are available under the general Settings > Page Planning. These can be set across the system or across tenants or individually within the template configuration (marked with 😉:
Feature | Description | Fig. |
|---|---|---|
Generate CSV export of placed products during print production | ||
Product feed | Default Type generic | |
Type configurable; feed type through which external data is loaded | ||
Visibility of the control elements | ||
Product search* | Display of the default search field | |
Show placed products separately* | In the Products menu, only the products already placed in the editor are displayed. A slider can also limit the display to the current page | |
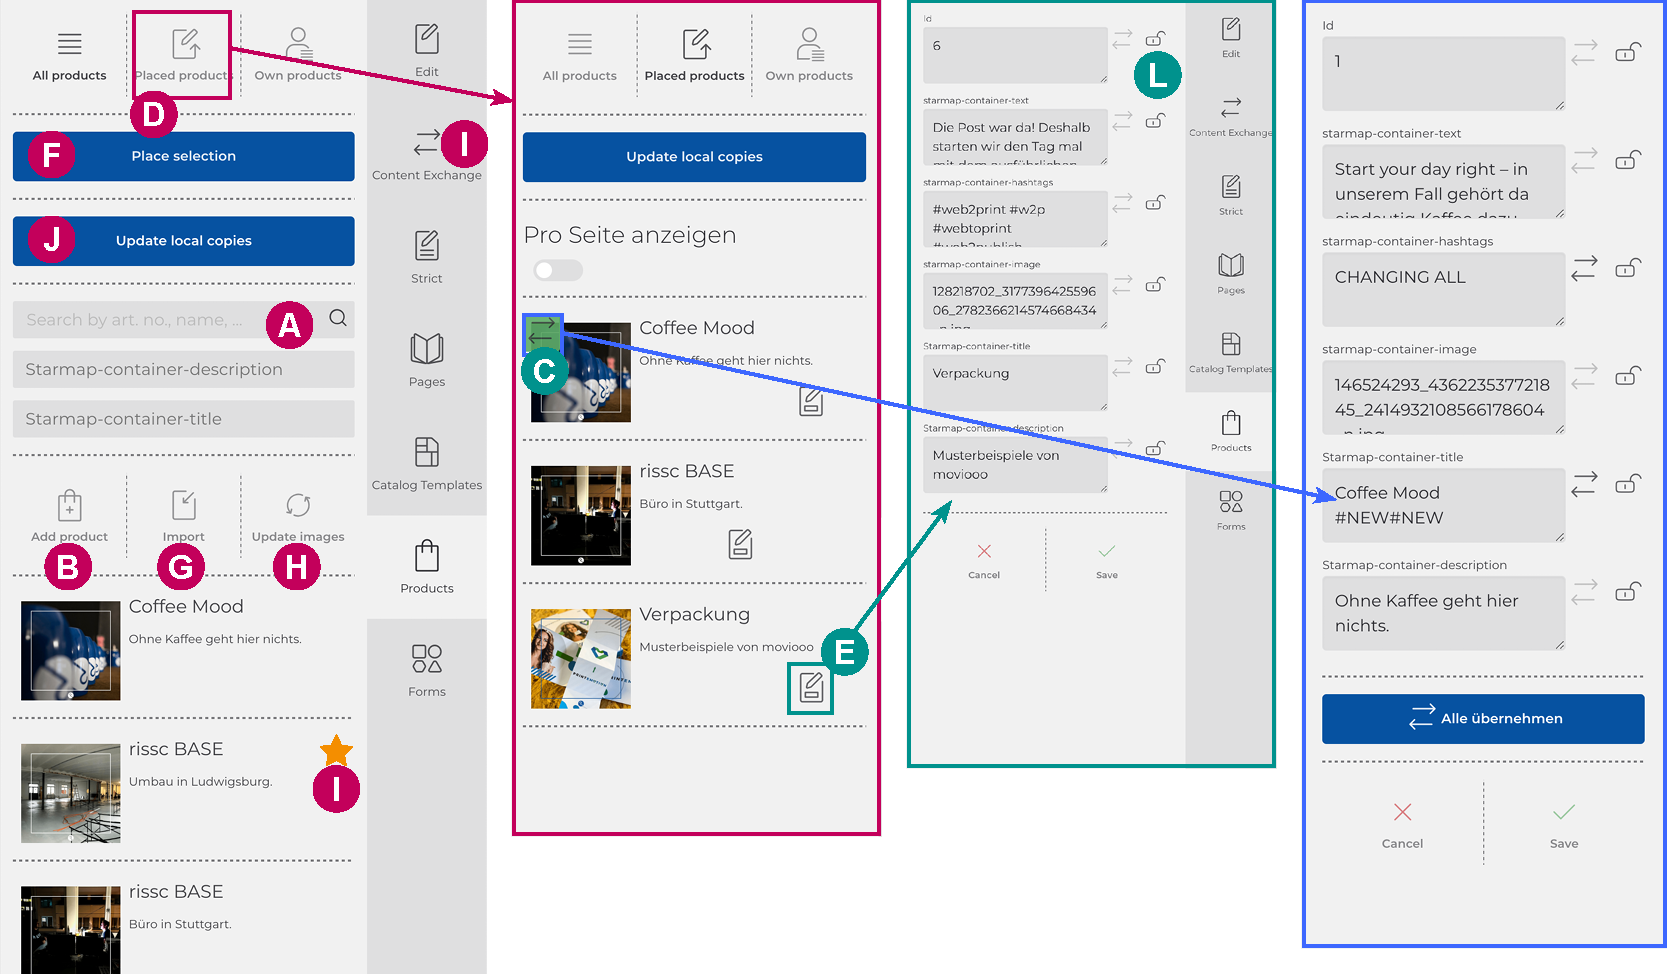
Compare product with original data | If adjustments are made to the content of a product either in the editor (via "Edit Product") or in the feed, it will be flagged in the "Placed Products" view. Clicking on the arrow symbol opens the form editor, highlighting the fields with modified content (active arrows). Hovering over them will display the original content. | |
Add product* | In the editor, a new product can be created; the content is entered using form fields | |
|
Template DataKeys can be used to change the label in the formeditor or to hide the DataKey completely. | ||
Edit product | Overwriting the content from the feed, where the content is entered using form fields | |
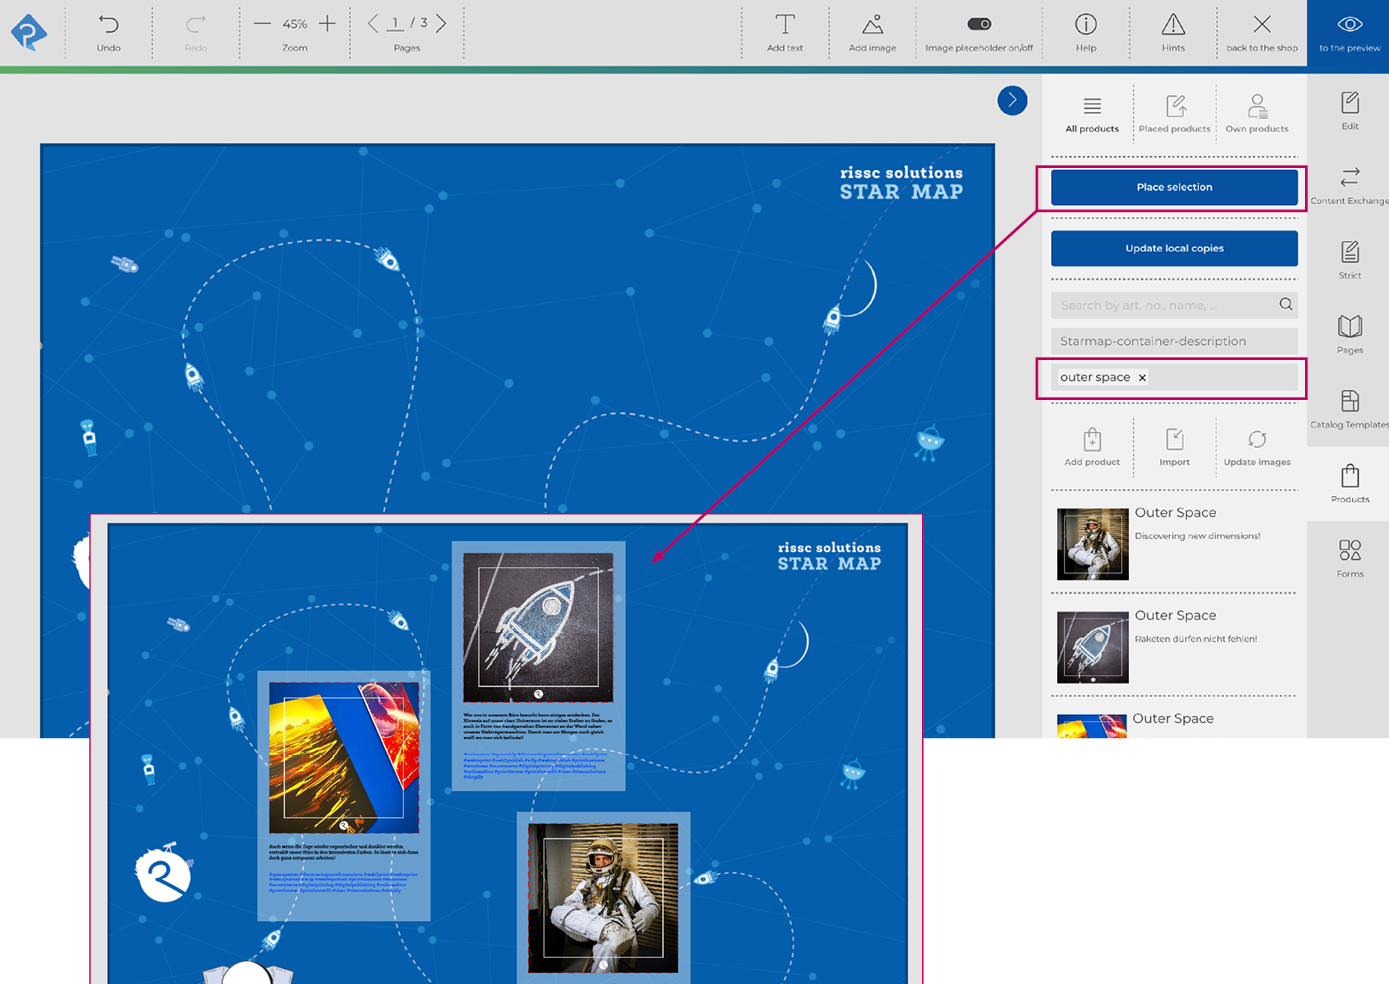
Through the "Place Selection" button, all containers on a page can be automatically filled. The desired items can be filtered through search, for example, using item numbers. Contents are placed successively in a container until it's full, then the next container is filled. This process continues until all containers on the page are full, which may result in products within a template being placed twice | ||
Fill all pages in the Template |
| |
Import product CSV | The option to upload a new feed CSV file within the editor | |
Update product images | A specific feature, in combination with Crossmedia, allows for the re-importation of all images from the feed via this button. The image references of the products are deleted and rewritten, necessary for instance when image files in Crossmedia have been updated. | |
Product content exchange * | By activating this menu in the sidebar (Start), container contents can be moved via drag and drop. When a container's content is replaced, it's copied to the clipboard and can then be pasted into another (previously activated by click) container in the sidebar using the plus symbol next to the preview. Rearranging contents is also possible. For article templates that contain additional containers (container in container), the contents of the master container can be swapped using drag&drop (this includes all containers and products placed in the container). | I + Screencast |
Update local copies * | Activating the checkbox displays a button in the editor feed menu. If this is used, all subsequent changes to the content (texts and images) of the feed (used in the draft) are applied to all products. Products that have already been placed and manually adjusted are also overwritten by the current feed data. | |
Lock data keys | This causes a lock symbol to appear in the “Edit product” view, which can be used to lock the data key for this product. If it is locked, the value can no longer be edited. | |
Clear Page | This button automatically removes all products currently placed on the page from their containers. In container-in-container setups, only the article templates on the top level remain, while all nested article templates are removed. | |
There are further setting options for the feed (not listed here); these apply to a special use case and are therefore not relevant for the regular feed.
Overview feed menu in the editor
Own Products
If the Allow creation and use of cross-draft products setting is activated, an additional submenu appears in which the user products are saved.
When adding a product, there is an additional checkbox Save product permanently, which activates the product as a user product.

Template configuration
Settings Article template
If desired, tags can be defined in the General menu to determine for which container(s) the article template is available.
Under Content, the respective image source must be selected for all image blocks to be filled.
Each DataKey that has been assigned to an image block in the IDML is listed under Media sources.
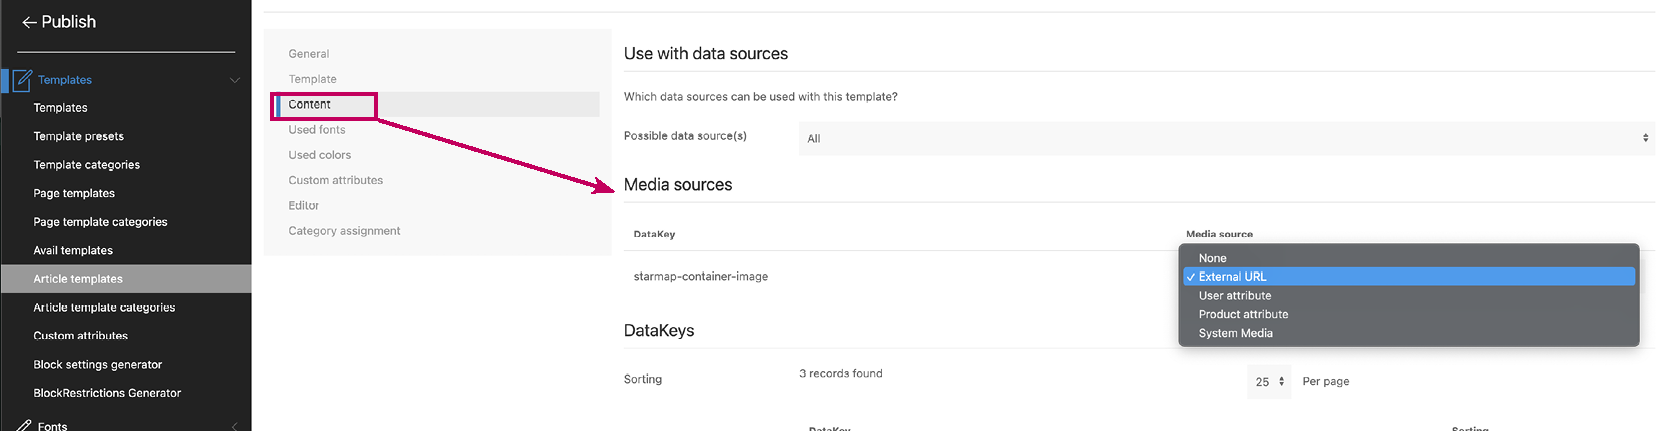
Possible sources:
External URL
System media
Settings Master-Template
Editor > Page Planning
*Some of the general settings can also be defined specifically for a (master) template.
A feed can be directly defined:
Template > Editor > Page Planning > Choose "Always create a page planning" and enter the desired feed (Dropdown appears after entering the first 3 letters):
The indicated feed will automatically load every time the template is opened but can be overridden upon opening or via API.
Alternatively, when opening the template from the admin, the checkbox "Create page planning" is activated:
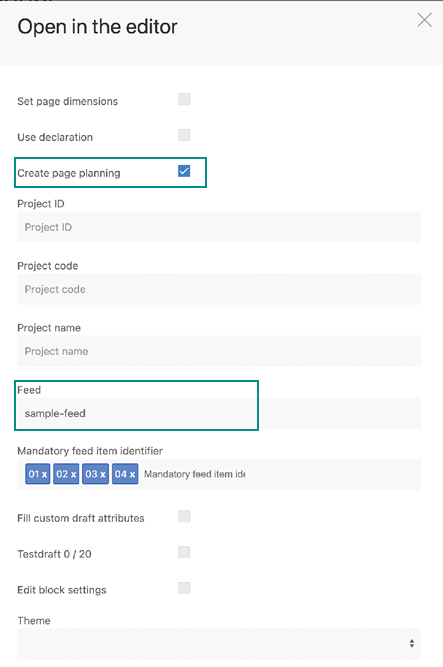
Under Feed, the desired pre-created feed is selected.
Special feature ![]() Optionally, a Project ID, code, or name can be entered.
Optionally, a Project ID, code, or name can be entered.
Define mandatory products
Using identifiers from the feed's CSV file, you can specify which products must be placed in a draft: Mandatory feed item identifiers, as seen in the screenshot above. (Via API or upon opening from the admin) Missing mandatory products can be defined as a warning or an error through the editor settings: Warnings and validations settings: Errors for missing mandatory feed item identifiers.
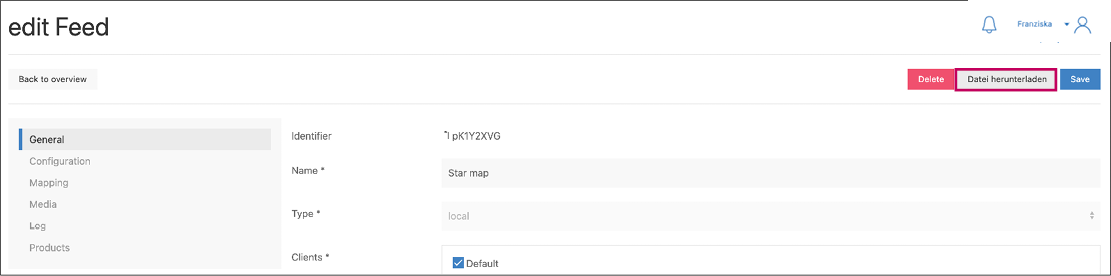
Update feed file
Feed type Local: Download or replace the feed file.
Through the Feed menu, you can download the CSV file by clicking on the "Download file" button in the respective feed.
Only the most recently uploaded file is always pulled into the backend. If adjustments are made to the feed via the editor, these changes are only contained within the feed file in the database, not within the admin area.
After revising the CSV file, it can be re-uploaded in the configuration, and the feed can be saved.
To ensure that the old feed doesn't just expand but potentially deletes records no longer present in the system, enabling "Delete data before import" is necessary.
In existing drafts, items that have already been placed won't be updated. Only the records that haven't been used yet will be adjusted by the new feed file.
Filter products through search and place them automatically
Through the "Automatically fill page" feature (which can be activated via the general Settings > Page Planning), products no longer need to be individually dragged into containers.
Once this feature is activated, a button called "Place Selection" appears in the Editor. Using the search function, desired products can be filtered. It's helpful to create corresponding search fields through Feed Mapping beforehand, such as a search field for the column "Article Name" in the CSV file. In the Editor, all desired articles can be entered (confirmed with Enter), and upon clicking the "Place Selection" button, they will automatically be placed into the available containers.
HTML Formats
* The printformer can interpret various tags, attributes, and values. Examples:
supported tags
h1 - h5
p
br
b
strong
i
em
u
s
strike
del
ul
ol
li
super
sub

### supported css attributes and values

#### on any supported tag
    - font-family
        - postscript or family name of an available font
    - font-weight
        - bold
    - font-style
        - italic
    - text-decoration
        - underline
        - line-through
    - text-transform
        - uppercase
    - font-size
        - values in px/pt (px get converted)
    - text-align
        - left
        - center
        - right
    - color
        - hex notation: \#ffffff
        - rgb notation: rgb(x, x, x)
        - cmyk notation cmyk(x, x, x, x)
        - color names [available color names](https://www.w3schools.com/colors/colors_names.asp)
#### only on ul / ol
    - list-style-type
        - lower-alpha
        - circle
        - square
        - or any single ascii char (unicode characters will follow soon)

### supported attributes
#### html
    - ..
#### data
    - data-leading
        - values in px/pt (px get converted)
    - data-overprint-stroke
        - true / false
    - data-overprint-fill
        - true / false